Labels

Monday, July 28, 2014

Vegetable Fajitas - and they're vegan!


We enjoy Mexican food in our home (well, at least what we in the U.S. call Mexican food).  One of our favorites happens to be fajitas. You can obviously make them with beef, pork or chicken, but you can also make them with no meat at all, just vegetables.

Since my wife has become vegetarian, I've been trying to cook a lot more vegetarian/vegan dishes. This one can be either but is primarily vegan (the only thing that's not vegan in it is the cheese and sour cream at the end which can easily be omitted or vegan substitutes used).
Some of the ingredients with Mac Brothers Beef Rub in the foreground

In this recipe, the only spice I'm using is Mac Brothers Beef Rub (or Spicy Beef Rub if you prefer). You could certainly use other spices, such as chili powder, cumin, etc. but the flavor you'll get out of using our rub is fantastic.

If you are cooking for vegetarian and non-vegetarian folks you can satisfy both with this recipe - simply follow as is for the non-meat eaters, and cut up some chicken, pork, or beef (or use shrimp) and sauté separately to add for those that would like it.

So, enough with the commentary, on to the recipe!

Ingredients*
Cut the onion into sections


  • 2 small zucchini, julienned
  • 2 small yellow squash, julienned
  • 1 tbsp kosher salt
  • 1 medium onion, sectioned
  • 4 medium cloves garlic, minced
  • 8 oz portobello mushrooms, sliced
  • 1 red pepper, cut into strips 
  • 3 tbsp Mac Brothers Mild Beef Rub (or Really Frickin' Hot Beef Rub), more or less to taste
  • 1 package multigrain tortillas (or flour or wheat tortillas)
  • 2 tbsp olive oil
    Julienned zucchini and squash


Optional

  • Cheese 
  • Sour cream


*These are the vegetables I used - any vegetables you happen to have on hand will work. If you don't have (or don't like) peppers, use something else, likewise the same is true of all of the rest of the vegetables.

Directions


  1. Put the julienned zucchini and squash in a colander
    Zucchini and squash with kosher salt mixed in
  2. Sprinkle the kosher salt over the zucchini and squash and mix together
    After sitting for about 40 minutes.  If you look closely you
    can see water beaded on the surface of the vegetables
  3. Let sit for a minimum of 20 minutes, up to an hour. This is to draw as much of the water as possible out of the zucchini and squash (while I'm waiting for the salt to work its magic, I actually do the rest of the prep; cutting the onion, garlic, mushrooms, peppers, etc.)
    After squeezing the excess water out of the zucchini/squash. This is necessary or you
    will have waterlogged fajitas.  The volume of vegetables will reduce by about half.
  4. After letting the salt sit with the zucchini/squash in the colander, much of the water will be drawn out but there will still be a lot in the vegetables. In order to get it out, you need to squeeze the water out by hand. You can use cheesecloth for this, but I just use my hands and squeeze it in batches as hard as I can which removes a huge amount of water. After this process, you will notice that the volume has been reduced by about half
  5. Heat one tbsp of olive oil in a heavy skillet over medium heat (I prefer to use cast iron for this)
    Sauté the onions until they get soft
  6. Add the onion and cook until pieces separate and they are just getting soft (about five minutes), stirring frequently
    Onions, peppers and mushrooms being sautéed 
  7. Add the peppers and mushrooms and stir frequently
  8. Cook until peppers and mushrooms are getting soft and starting to give up their juices (about five to seven minutes), stirring frequently
    Add the rub to the onion, pepper, mushroom mix
  9. Add one tbsp of the Beef Rub and mix well
  10. Remove onions, peppers, and mushrooms from the pan
  11. Add last tbsp of olive oil to the pan, then add the minced garlic and cook for about 30 seconds or until garlic is fragrant
    The zucchini/squash mixture with the rub added
  12. Add zucchini and squash to the skillet
  13. Add one tbsp of Rub and mix well. Continue cooking, stirring frequently for about 3 - 4 minutes
    Add the onions/pepper/mushroom mix back into the zucchini/squash
  14. Add onions/pepper/mushroom mix to the zucchini/squash and mix well
  15. Add the final tbsp of Rub. Add additional rub to taste
  16. Heat tortillas according to directions on package
    Tortilla with fajita mixture added, topped
    with sour cream and cheese (optional)
  17. Serve with cheese and sour cream (optional) and enjoy!


Sunday, July 27, 2014

Baked Stuffed Lobster - better than any restaurant!


Anyone who knows me knows I don't care for seafood.  It's not that I don't WANT to like it, but when and where I grew up (Kansas in the 60's and 70's) it simply didn't exist - at least not in our family. I just never developed a taste for it.

My wife however, is a different story. She mainly sticks to a vegetarian diet, but sometimes she wants seafood. Just because I don't eat it doesn't mean I won't make it for her. This is one of her favorites and I can't actually vouch for it since I won't eat it, but she swears it's better than any lobster you get in a restaurant - even the ones on the shore with the freshest ingredients possible.

I believe it's a combination of the method of cooking and the stuffing itself (which she swears by). Again, I don't eat it so I can't personally vouch for it but I have to believe from how much she enjoys it that it must be pretty good. She also says that the same stuffing is fantastic in baked stuffed shrimp as well.

So, if you like baked stuffed lobster and have never attempted to do it yourself, here's your chance!
All the ingredients are ready.  The small alien-looking
thing in the front is the calamari. The device that looks
like a medieval torture device is really just a juicer.

Ingredients


  • 1 lobster (1 1/4 - 2 pounds)
  • 30 -36 Ritz crackers, crushed (one sleeve)
  • 1 1/2 tbsp Grandpa's Best seafood rub (Slap My Bass & Call Me Sally)
  • 2 cloves garlic, minced
  • 1/2 small onion, chopped
  • 1 medium lemon (keep both juice & zest)
  • 1/2 cup butter (1 stick)
  • 2 tbsp grated parmesan cheese
  • 1/4 lb fresh calamari, chopped*

*NOTE: You can use any type of seafood you like. My wife likes calamari so that's what we generally use, but you can chop up scallops, shrimp, etc.
This is what the calamari looks like when it's chopped up

Directions

Prepare the stuffing
  1. Melt butter in medium sauce pan
    Sauté the onions in the butter
  2. Add chopped onions and sauté until just soft (not browned)
  3. Add minced garlic and sauté until fragrant
    The onions, garlic and calamari
  4. Add chopped calamari and cook for 1 minute
    All of the stuffing ingredients mixed together
  5. Add remaining ingredients and stir until mixed
    The stuffing mixture should be moist enough to mold when pinched together.
    In order to show that (and because I was bored) I made a shape out of the stuffing.
    Behold, Batman stuffing!  Something you're not likely to see on any other blogs.
  6. Mixture should be moist enough to mold when pinched
  7. Preheat the oven to 425
Prepare the lobster

  1. Place the lobster flat on its stomach. With a very sharp, heavy knife pierce the lobster just behind the head and cut down vertically all the way to the end of the tail
    The point of the knife indicates where you should insert the knife when cutting
    the lobster. You will insert the knife vertically and slice down through the head.
    Remove the knife and put in the same place, pointing towards the tail. Slice
    downwards, cutting through completely, making two pieces.
  2. At this point, the lobster should be cut in half down the middle. Remove all of the "innards" from both halves. Some people like to eat this part, and if so you can fold it into the stuffing. If not, simply discard
    Immediately after slicing but before removing the "innards" (above)
    After cleaning (below). For some reason every time I look
    at this I think of the creatures in "Alien".
  3. Crack each claw by hitting it with the back of the heavy knife so that the meat in the claws can cook thoroughly
    Crack the claws so the meat can cook
  4. Place the lobster halves on the tray with the now hollow sections next to each other
    Add the stuffing to the lobster, not packing too tightly
  5. Take the stuffing that you have prepared and spread over the center and into the hollows so that the lobsters look whole again. Do not pack the stuffing tightly, or it may affect the even baking of the lobster
    Out of the oven
  6. Put in the oven and check after about 15 minutes. Cook longer if necessary
    Serve with extra lemon and butter and enjoy!!!


Easy BBQ Chicken


It seems like everyone has their own way to make BBQ chicken - but I've had a LOT of people ask me about the best way to do it.  I'm sure it has something to do with the fact that we make and sell our own sauces and rubs but this is actually a question I've been getting for far longer than we've been doing that.

From what most people tell me, the most common problem seems to be that they burn the outside of their chicken while the inside is still not done. And there aren't many things less appetizing than biting into what looks like a delicious piece of chicken and then finding that it's still pink (or red!) in the middle.

I'm going to tell you how to avoid that - or at least how I avoid it. I remember both my grandfather and my mother doing this as far back as I CAN remember. Of course, they didn't use our rub, since we just developed that particular product. What we used instead of rub was a mixture of sugar and chili powder sprinkled on the chicken (if you want to try this, it IS good - simply not as good as the rub) mixed until it resembled the traditional cinnamon/sugar mixture most people are familiar with.

The other nice part about this is that you can still have "grilled" chicken without the grill if it's too hot, rainy, snowy, or cold outside or if you simply don't have a grill. Instead of cooking for the last few minutes on your grill, just use a preheated cast iron grill pan. You'll get the same grill marks and for the most part, the same flavor (some people debate whether or not the open fire on a grill actually adds any flavor - I tend to think it does but wouldn't argue with those that feel the opposite).

Brining is NOT difficult - quite the contrary. I'm sure you can find some very complicated brines in that search that you just did, but it's really not necessary. The one I use is called "Not Just For Turkey".  The directions are on the package, but essentially, you use 1 tbsp of the brine mix with 1 cup of liquid (water, apple cider, wine, etc.). 

A common misconception about brining is that it makes things salty: WRONG!! Yes, there is salt in the brine, but it doesn't make it taste salty - at all.

So, without further ado, here it is:

Ingredients

  • 1 whole fryer chicken, cut up (alternatively, feel free to use "pre-cut" chicken parts if you prefer)
  • Grandpa's Best Butter My Butt & Call Me a Biscuit Pork and Poultry Rub *
  • Grandpa's Best Not Just For Turkey Brine *
  • Grandpa's Best BBQ Sauce (any variety)

*NOTE:  I don't list the amount of rub here simply because you're going to sprinkle the rub liberally on the chicken and it's going to depend on the size and number of the pieces of chicken you're using.  Similarly, the amount of brine mix you will use will depend on the size of the container you're using.  You need to make enough to cover the chicken.

Chicken in the brine solution

Directions

  1. Make the brine.  Mix together enough brine mix to cover the chicken at a ratio of 1 tbsp brine mix plus 1 cup of your choice of liquid
  2. Add the cut up chicken to the brine
  3. Let sit in the refrigerator overnight
  4. Preheat oven to 350
  5. Remove the pieces from the brine and pat dry, then place in a large pan
    Rub on one side of the chicken - one piece
    not touched so you can see the difference.
    Remember to flip it and cover both sides!
  6. Sprinkle rub liberally over the surface of the chicken (see picture for an idea of how it should look); make certain you cover all surfaces of the chicken with the rub
  7. Be certain the pan is large enough that the pieces of chicken aren't too crowded - if they are, it will greatly extend the cooking time)
    Chicken with rub on both sides, ready to go in the oven
  8. Cover and bake until the internal temperature of the thickest part of the chicken reaches a minimum of 150 degrees (that's not quite a safe temperature to eat yet, but it will continue to cook for a few minutes after removing and you will be finishing it off on the grill)
    Straight out of the oven and ready for the grill
  9. Remove from the oven - at this point, you can set it to the side until you're ready to put it on the grill
    On the grill, ready to add sauce
  10. Place all of the chicken on a preheated grill.  I heat mine to about 400 degrees
  11. Using a grill brush, spread BBQ sauce on the top of the chicken
  12. Close grill and cook for about five minutes
    After flipping once on the grill and adding sauce
  13. Turn chicken over and again spread sauce on top of the chicken
  14. Close grill and cook for about five minutes
    This has been on the grill for about ten minutes and is ready to be removed
  15. Remove from grill - I typically put a bit more sauce on the last side that was cooked right after removing from the grill (keep in mind, the USDA minimum safe temperature for chicken is 165 degrees)
  16. Enjoy!

The nice thing about employing this method is that your chicken is going to be some of the moistest, juiciest BBQ chicken you've ever had! Some people like to parboil their chicken, but that makes the meat have a rubbery texture and loses the flavor - parBAKING with a rub is the best way!

Let me know what you think in the comments if you try this!!


Tuesday, July 15, 2014

BBQ Baked Beans

Baked beans  - when I hear those two words I always think of summer and picnics/BBQ's.  I don't think we have ever had one (now or when I was a kid) where we didn't have baked beans.

Now, they weren't always GOOD baked beans. Sometimes they were nothing but someone dumping a can of Campbell's Pork & Beans into a pan and heating them up (nothing against Campbell's, but that's NOT the way we like them in our family) - but however they were made, they were always there. That part really hasn't changed much - the difference now is that since I usually host most of the picnics I end up attending, I make them so I KNOW that's not what they are!

My family also had a catering business at one time and since it was primarily outside food (ribs, chicken, burgers, dogs, etc), baked beans were one of our go-to sides. After every job, someone (or a lot of someones) asked for the recipe. Even now, when we have invite guests for dinner, I have to make them (even if they don't go with the rest of the meal at all) or I'm afraid I'll be disowned - that's how good they are. Part of the secret is using BBQ sauce in the beans. Of course I'd be remiss if I didn't tell you that the best sauce to use is Mac Brothers, but in reality whatever sauce you like will work. If you don't have any Mac Brothers on hand, K.C. Masterpiece is a good substitute.

This recipe has been in my family for years - I remember both my mother and my grandfather making it when I was a kid.  As is the case with most everything I make, I've changed it a bit - not a lot, just tweaks here and there that I think make it taste better. I'll note where I've made the changes and what they were so if you prefer to do it the "old-fashioned" (and easier) way, you can.

NOTE FOR VEGETARIANS!!
If you want to make them vegetarian, start out with using cans of vegetarian beans and skip the bacon. I frequently make two batches when we have a lot of people over for a cookout (one vegetarian, one not).

This recipe is for a party with a lot of people (at least a dozen).  If you're fixing it for your family you can adjust the size accordingly (unless you want a lot of leftovers!).

If you try them, let me know what you think!
Garlic and onions ready to go

Ingredients

6 cans baked beans (11 oz)*
1 medium onion, diced
4 cloves garlic, minced
12 pieces bacon, cut into small pieces
1 1/2 cups brown sugar
1 cup Grandpa's Best Sweet & Mild BBQ Sauce**
2 tsp liquid smoke

*NOTE: Use whatever brand of beans you like. We like Van Camp's, but they are difficult to find where I live, so we frequently use Bush's. They also seem to come in a variety of can sizes.  I made these two weeks ago and used six 11 oz cans. I had to make them for another party last week and they were almost out of the 11 oz size, so I bought a 48 oz can and the last two 11 oz cans.  As long as you're close to the right amount, it's good enough.

**For just a bit more heat, try Grandpa's Best Warm & Smoky BBQ Sauce instead.

Directions

  1. Preheat oven to 350
  2. Drain about half of the beans (in this case, three cans)

  3. Cook the bacon in a skillet over medium heat until it gets crisp. I use two strips of bacon per can, hence 12 strips (this is one of those steps I added - in the original recipe, the bacon was still there, but it wasn't cooked.  You simply stir it into the beans and leave two strips for the top. It will cook in the oven, but I prefer the flavor - and texture - of the precooked, crispy bacon)
    You want the bacon to be nice and crispy
  4. While the bacon is cooking, add the liquid smoke, BBQ sauce and one cup of the brown sugar to the beans and mix it in
    After stirring in the brown sugar, liquid smoke and BBQ sauce
  5. Use a slotted spoon to remove the bacon and add the onions (if you want vegetarian beans, simply sauté the onions in a small amount of olive oil instead). Once again, this is a step I added. In the original recipe, you simply add the raw onions to the beans - they will cook a bit in the oven as well
  6. Cook until they are just starting to brown and add the garlic (the garlic is another added step - it didn't exist in the original, but I REALLY like garlic)

  7. Cook until the garlic is starting to get fragrant (about 30 seconds to one minute)
  8. Remove from the stove and pour the rendered bacon fat, onions and garlic into the beans along with the bacon and mix well
    Ready for the oven
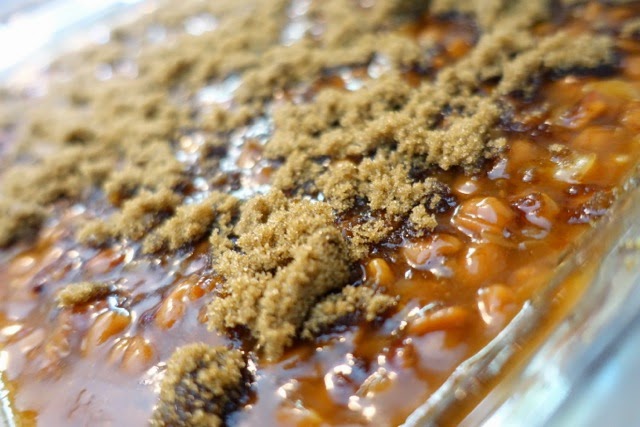
  9. Sprinkle the top with the last 1/2 cup of brown sugar

    Straight out of the oven and ready to eat!
  10. Bake for an hour
  11. Enjoy!


Wednesday, July 9, 2014

Crispy Oatmeal Raisin Cookies


For me, oatmeal raisin cookies conjure up memories of my grandmother. She used to make them for us when we were kids, which is probably why I like them so much to this day. I wish I had her recipe but since I don't, I decided awhile back to make my own version.

These are very crispy cookies rather than being soft and chewy. I tend to prefer a crisp cookie so these are really what I like - and they are also very "buttery" (if that's a word!).  With apologies in advance to my grandmother, I actually think they're the best oatmeal raisin cookies I've ever had.

Try them yourself and let me know what you think!

Ingredients (makes about 4 dozen cookies)

  • 3/4 lb (3 sticks) salted butter
  • 1 1/4 cup brown sugar (light or dark brown will work - I personally prefer dark)
  • 1 cup granulated sugar
  • 1 large egg, beaten
  • 2 tsp vanilla extract
  • 3 cups rolled oats (not instant)
  • 1 1/2 cups all-purpose flour
  • 3/4 tsp salt
  • 2 1/2 tsp baking soda
  • 1 1/2 tsp cinnamon
  • 1/8 tsp nutmeg
  • 1 1/2 cups raisins (you can also use dried cranberries a.k.a. craisins - I like both, but I used craisins for this batch)

Directions

  1. Preheat the oven to 350 degrees F.
  2. In a mixer, cream the butter until fluffy
    Cream the butter - and yes, my mixer has flames
  3. Add both the sugar and brown sugar and cream together until light and fluffy
    Sugar and brown sugar added to the butter
  4. Add the egg and vanilla and mix well
    Cream both the sugars and the butter
  5. In a bowl, stir together the oats, flour, salt, baking soda, cinnamon and nutmeg
    Stir the oats, flour, salt, baking soda, cinnamon and nutmeg together
  6. Slowly add the oat mixture to the butter mixture and mix just until combined

  7. Add raisins and mix just until combined
    For this batch, I used dried cranberries (craisins) instead of raisins - either work fine!
  8. Drop by tablespoonfuls onto the baking sheets, leaving at least 2-inches between cookies*


  9. Bake until browned and crispy around the edges, about 8 to 10 minutes

  10. Let cool on wire racks and store in an airtight container

  11. Enjoy!

*NOTE: If you want a crispier cookie, press them down a bit with your fingers or the back of a spoon when you place them on the baking sheet - if you want them a bit chewier then don't press them down (they will be crispy cookies either way, it's just a matter of HOW crispy you want them).

I frequently only make a dozen or two at a time and put the rest of the dough in a sealed container in the refrigerator. It will last for quite awhile this way (I've kept it for over a month) and then make a dozen at a time whenever I want them until the dough is gone.