Labels

Sunday, January 28, 2018

Easy Crockpot Ribs


Before I go any further, I need to clarify something.  I have a smoker - multiple smokers actually.  I also have multiple grills.

So, you may (rightfully) ask, why am I cooking ribs in a crockpot?

Excellent question.  There are multiple parts to the answer:
  1. Weather.  Sometimes the weather just doesn't want to cooperate.  I'm not fond of cleaning off the snow to use my outside equipment.  Same holds true with rain.  I'll use the smoker/grill when it's lightly raining but not when it's pouring.
  2. Convenience. There are times when it's just easy to pop the ribs in the crockpot and walk away for awhile. 
  3. The number one reason? I have a cooking blog and I know not everyone is as lucky as me and has a smoker. 
Also, since I have a small BBQ sauce company on the side, I'm frequently asked by customers how they can make ribs to use our sauces and rubs WITHOUT a smoker.

This is one way to do it.  I know there are several recipes out there.  Some use root beer, some use Dr. Pepper, yet others use fruit jams.  This one uses apple juice.  Oh yeah, and BBQ sauce.

Of course, I'd love you to use my BBQ sauce, but the truth is that any sauce you like will work.  If you should want to try our sauce, you can find it here.

And for the inevitable question, do they taste as good as using a smoker?  In my opinion, no.  BUT (and it's a huge but) you can make them without having to invest in an expensive piece of equipment you may have no interest in or no place to put.  They also have the advantage of being very good, simply without the added smoke flavor.

Now, on to the recipe.


Ingredients

  • 1 rack pork ribs (2-3 pounds)
  • 2-3 tbsp rub* (I use my Pork and Poultry Rub, but any rub you like will work.)
  • 1 cup apple juice
  • 1 1/2 cup BBQ sauce (For this, I used our Sweet and Mild sauce.  We have 11 sauces available ranging from mild to very hot.  You can use any sauce you like and it will work fine.)
*If you prefer, you can use salt and pepper instead of a rub.  Simply sprinkle however much you'd like on both sides of the ribs in place of the rub.

Directions

  1. Turn the broiler on in your oven to preheat.  
  2. Ribs frequently have a membrane on one side.  You can choose to leave this on if you'd like, but I always remove it.  It helps the rub to penetrate the meat and gives a better flavor.  To remove it, the best way is to grab one edge of it and simply pull it off.  It can be difficult to grab but it's much easier if you use a paper towel.  If you make a lot of ribs, you can actually purchase a tool that will make the job of removing the membrane much easier.

    Membrane on the ribs
    Tool for removing membrane.  Grabbing with a paper towel works just fine.
  3. After you remove the membrane you can trim the ribs if you choose.  There will be no difference in taste either way.

    Ribs trimmed and ready to be rubbed.  Trimming is NOT necessary
    The meat that was trimmed off is above and to the right and will also be cooked
  4. After you trim the ribs (optional), you are ready to use your rub.  Simply sprinkle a fairly heavy coating on both sides of the ribs and rub it into the meat.  If you prefer to use salt and pepper instead, do the same thing with it.


  5. Put the ribs on a lipped pan.  You can use a sheet of parchment paper or foil to line it to facilitate cleanup if you'd like.
  6. Put the pan in the preheated oven for five minutes.
  7. Flip the ribs over for an additional five minutes.


  8. If you use a crockpot liner, this is the time to put it in.  If you'd like to try one, you can find them here
  9. Pour the apple juice in the crockpot (with or without the liner).
  10. Remove the ribs from the oven.
  11. Put the ribs in the crockpot with the apple juice. You may have to cut the ribs for them to fit, depending upon the size of your crockpot.
  12. Pour one cup of BBQ sauce over the ribs.
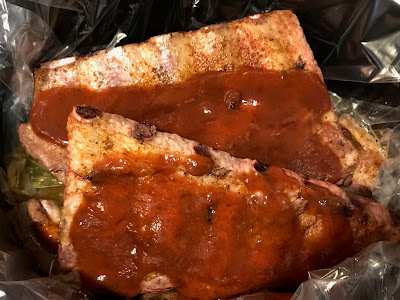

  13. Cover the ribs and cook on HIGH setting for four hours.  You can cook them for 6-8 hours on low if you prefer.  If you do, the texture of the meat will become somewhat "mushy" though the taste will be the same.


    Ready to come out of crockpot
  14. After the four hours is up, carefully remove the ribs and place on a lipped pan.
  15. Turn the oven to 350.
  16. Using the 1/2 cup of BBQ sauce you have left, spread it over both sides of the ribs.


  17. Put the ribs in the oven for about 15-20 minutes.  This will "tighten" up the sauce and give them a wonderful flavor and a better appearance.


  18. Remove the ribs from the oven and serve.

Monday, January 22, 2018

Bacon Wrapped, Maple Glazed Pork Roast


I love a good roast. It can be pork, beef or just a good roasted chicken.

My wife isn't fond of beef, so a beef roast is something we have infrequently.  She DOES love pork though, so I don't have to do much convincing before I make this for a Sunday dinner.

I brine nearly all of my pork and poultry before I use it.  I simply feel that brining makes it taste better and helps the meat retain its moisture.  It's so easy to overcook and dry out a good pork loin that I believe brining is a necessary step and have been doing it for years.

I'm not going to give a brine or stuffing recipe in this post.  There are MANY variations available on the web and I have a brine recipe here or here (and a completely different one here).  For the most part, any brine will work on either pork or poultry.  You simply have to find one that you like.  The same is true with stuffing.  Whether you want the convenience of a box of Stove Top stuffing or you make it from scratch, it will work.  You just want some form of bread based stuffing though I'm certain other types would work as well.

For the roast in this post, I used a brine with apple cider in it and put apples in my stuffing.  I tend to like apple and pork together, and this gives a subtle boost to the flavor.

The technique I used to cut the roast is called a roll cut.  You basically just "roll" the roast out as you're cutting it.  If you have problems with this (or simply with understanding my instructions) there are many good videos on YouTube of how to do it.  That's how I learned.  This is only my second time trying this type of cut and it turned out fine (both times).

This technique and recipe should work for any size pork roast.  You will simply have to adjust the amount of brine (optional) and stuffing you use based on the size of the roast.  The roast in this post was about 3 1/2 pounds.  The last one I did was nine pounds and it worked equally well on both.

Lastly, if you have any questions/comments on the technique (or anything else) feel free to send me an email or leave a comment.  You can also find me on Facebook and leave me a message or question there.

Ingredients*

  • Pork roast/loin (Any size will work.  The one in this post is about 3 1/2 lbs, the last one I did was 9 lbs.)
  • Prepared stuffing (Any stuffing that you would use in a turkey would work well here.)
  • Bacon (The amount will depend on the size of the roast.  You need enough to be able to cover the roast.)
  • Maple syrup or honey (again, depends on size of roast, but typically 1/4 cup is enough)
  • Salt and pepper to taste
* You will also need butcher's twine to tie the roast up before putting in the oven.

Directions

  1. Preheat oven to 425 degrees.
  2. Place roast (brined or not) on cutting board


  3. Starting on the left side of the roast,  (if positioned as in the picture above) using a very sharp knife , make an approximately one to two inch cut just above the line of fat, going into the meat.  It's important to keep your knife parallel to the cutting board when doing this.  


  4. Push the meat back and again, make a cut in the meat, "rolling" it back towards the opposite end of the cutting board.


  5. Continue doing this until the roast is basically flattened out.  It isn't going to look nice and even.  (Well, if you're anything like me it won't.)  How the meat looks won't make any difference in the final product and no one will notice.


  6. The end result will be a fairly flat piece of meat that you will be putting your stuffing on in order to roll back up.
  7. Salt and pepper both sides of the roast generously.  I also like using a rub on the meat.  In my case, I used Mac Brothers Pork Rub, but salt and pepper alone will work fine.


  8. Next, spread the prepared stuffing on the exposed side of the meat.  You want the fat side of the meat DOWN at this point so it will be on the outside of the roast.


  9. Leave a border of about an inch along the sides of the meat.  Leave about two inches from the end where you stopped your cut.
  10. Starting at the far end, you want to start rolling up the roast gently.  Looking at the picture below, this is on the right side which is the side of the meat where you ended your cut.  You want to keep rolling fairly tight but not tight enough that you push the stuffing out of the ends.


  11. Continue carefully rolling the meat up until it again is the size and shape of a typical roast.


  12. Now, the roast needs to be tied together so it won't fall apart as it cooks.  You will need some butcher's twine.  There is no need to tie fancy knots like you sometimes see on these (unless of course you know how to do that and feel like it!).  I tie it in multiple places along the top with a simple knot (There were four ties for this roast.  I think I used seven on the nine pound roast I made.).


  13. The next step is to cover the outside with bacon.  There are multiple ways to do this.  The easiest is to simply take strips of bacon and wrap them around the outside.  I decided to make a bacon "weave" and wrap that around the roast.  This will only work if your roast is fairly small (probably four pounds or less), otherwise it won't fit unless you do more than one weave.  A "hack" that simplifies working with the weave is to put it in the freezer for a few minutes after it's been woven together.  If you do this, it will be much easier to work with and wrap around the roast.


  14. Brush the bacon with the maple syrup (or honey if you prefer).


  15. Place roast on a roasting rack in a pan.  You are now ready to put your roast in the oven. Your oven should be at 425 degrees at this point.  You only want to cook at this high temperature for 15 minutes to give a good sear.
  16. Turn oven down to 325 degrees after the initial 15 minutes and continue roasting.  You should baste the bacon at least one more time with the maple syrup or honey while it's roasting. When you turn the oven down to 325 is a good time to do this. You can do this multiple times if you want a heavier maple/honey flavor, but one additional time is sufficient.  
  17. How long your roast takes to cook is going to be determined by how large your roast is.  A good rule of thumb is 25 minutes per pound but it's important to go by INTERNAL TEMPERATURE, not time. The USDA recommends between 145-165 for pork.  I much prefer the lower end of that time so it's not dried out.  I typically keep it in until it hits about 140, then take it out and loosely cover with foil for about 15 minutes.  The internal temperature will rise that extra five degrees after it's taken out of the oven and before it starts to cool.
  18. Remove from oven when temp hits between 140-160 (depending upon preference) and tent loosely with foil for fifteen minutes.


  19. Cut into slices and serve


When I make this, I typically put vegetables in the bottom of the pan.  This time I used parsnips and carrots.  Any kind of root vegetables work well for this.  I also put a small amount of chicken stock in the bottom of the pan (only about 1/4 inch).  The juices from the roast and bacon will drip into this and become a great way to make gravy if you wish.  It also helps keep the roast from drying out.  If you choose to do this you should check every 20 minutes or so and add more stock as needed as the juices burn off.


Saturday, January 20, 2018

Healthy Lettuce Wraps

Lettuce wraps, ready to eat!
We love Asian foods and many of the "fusion" styles that have come out lately melding different styles of cooking.

We also happen to love a chain called P.F. Chang's.  One of their "signature" appetizers is something called a lettuce wrap.  If you've been to P.F. Chang's, you likely know exactly what I'm talking about.  The taste is fantastic. They are somehow both light (because of the lettuce) and filling at the same time.

We wanted to try these at home and this is what I have come up with.  It's not an exact duplicate, but it is very close.  It also satisfies those cravings we sometimes have without having to spend a lot of money.

I have made it with both ground chicken and turkey and can't really tell the difference between the two, so either will work.

If you love these like we do, or if you just want to give it a try you will be surprised at how simple this is.  It's one of the simpler recipes I've ever written up and just takes a few minutes to make.


Ingredients
  • 2 tsp olive oil
  • 1/2 tsp sesame oil
  • 1 pound ground chicken or turkey
  • 4 cloves garlic, minced
  • 1 small onion, diced
  • 1/3 cup hoisin sauce
  • 2 tbsp soy sauce
  • 2 tbsp rice wine vinegar
  • 1 tbsp freshly grated ginger
  • 1 tsp sriracha (Optional.  We don't care for hot foods in our house so we don't use this.  If you love hot foods you may want to use more than one tsp.)
  • 8 oz mushrooms, diced (Optional. I use shiitake when I can find them.)
  • 8 oz carrots, diced fine (optional)
  • 1 (8 oz) can sliced water chestnuts, drained
  • 2 scallions, thinly sliced
  • salt and pepper, to taste
  • 1 head butter lettuce (Boston or Bibb lettuce are basically the same thing so are interchangeable

Instructions 

  1. Add one tsp of olive oil and ground chicken or turkey to a large non-stick skillet.  Cook the meat until it's just done while making sure to break it up, then drain any fat that you may have left and set aside.

    Ground chicken/turkey after being browned and drained of fat
  2. Add second tsp of olive oil and sesame oil to the pan, then add the onions (along with the mushrooms and carrots if using them).  Let sauté until the onions are translucent, about two minutes.

    Before cooking, after vegetables added to pan

                         
    After cooking vegetables for a few minutes
  3. Add the garlic and sauté until fragrant (about 30 seconds).  Be careful not to burn the garlic or it can get bitter.

    Add the garlic and cook for about 30 seconds
  4. Add the meat back to the pan (along with the vegetables).

    Meat and vegetables before adding hoisin, soy sauce, etc.
  5. Stir in the hoisin sauce, soy sauce, rice wine vinegar, ginger and sriracha (if using).
  6. Stir in the remainder of the ingredients (water chestnuts and scallions) along with salt and pepper to taste and cook for an additional two minutes.

    Ready to be put onto lettuce
  7. Spoon several tbsp of the mixture (how much is entirely dependent on the size of the lettuce leaves you have and your own taste) onto the center of a lettuce leaf and enjoy!
  8. Ready to eat!

Monday, January 15, 2018

Braised Short Ribs


Short ribs on a bed of polenta and mashed potatoes with pan juices in lieu of gravy

Growing up, we used to have pot roast regularly (at least twice a month).  I know, I know, this post is about short ribs, not pot roast.

I only mention pot roast because I think of this recipe as pot roast for grown ups.  If you don't have short ribs available you can easily substitute a good chuck roast in place of the short ribs and the taste will be nearly identical.  I have done that on many occasions, based on what I have in the freezer, or what's on sale, when the mood strikes me.  In the accompanying pictures, you will see some with short ribs and some with chuck roast.  Again, the reason for that is to drive home the point that they can be used interchangeably (at least in this recipe).  

So, let me state upfront that this is NOT your mother's (or in my case, my grandfather's) short ribs/pot roast.  Well, not unless they cooked with plenty of wine (which was unheard of in my family).  The flavor is very rich and complex.

The comment I hear most often when I make this for company is, "I can't believe short ribs/pot roast can taste this good!  I never really liked it before."

You can serve this with the pan juices or turn them into gravy.  I've done both, but we're a gravy kind of household, so that's what we generally do here.  Directions for how to make the gravy are listed below as well.

I'll let you be the judge.  Give it a try and see what you think.


Short ribs
Chuck roast

Ingredients
  • 5 lb short ribs (or chuck roast)
  • two onions
  • 6-8 carrots
  • 4 cloves garlic, smashed
  • 4 sprigs rosemary
  • 4 sprigs thyme
  • flour (enough to cover the short ribs/roast, about a half cup)
  • salt & pepper 
  • 2 quarts beef broth
  • 1-2 cups wine (depending upon taste - I always use the larger amount)
  • 2 tbsp olive oil (for browning beef)
  • 4 bay leaves
  • 2 pkg Lipton Beefy Onion Soup Mix
       Gravy (optional  - Well, unless you're in my family, then it's a necessity.)
  • 1 stick butter (4 oz)
  • 1/2 cup flour (4 oz)


Instructions
  1. Preheat oven to 275
  2. Salt and pepper all sides of short ribs/roast


  3. Thoroughly cover all sides of short ribs/roast with flour


  4. Peel and cut two onions in half
  5. Peel third onion and cut into slices
  6. Tie rosemary and thyme into bundle and set aside

    I also have started wrapping the herbs in cheesecloth simply to make it easier to remove later

  7. Put olive oil in pan with medium heat, brown the onion on both sides, remove to a plate


  8. Brown the carrots (not cooking thoroughly, just browning) and remove to plate


  9. Cook the garlic  - it only takes 30-60 seconds


  10. Add more oil if necessary, then brown all sides of short ribs/roast and remove

    Chuck roast browned
    Short ribs browned


  11. Add wine to pan to deglaze. Cook until reduced by half


  12. Add broth to pan
  13. Stir in ONE package onion soup mix
  14. Add short ribs/roast back to pan, followed by garlic, carrots and onion
  15. Sprinkle second package of onion soup mix over top of short ribs/roast, then lay sliced onions on top. If it all won’t fit, just put the rest in the broth (With a roast, I find that it generally will fit on top. With short ribs, I just stir the onion soup mix into the broth since they are usually submerged.)
  16. Add tied bundle of rosemary and thyme to broth
  17. Add bay leaves to broth


  18. Cover and put in 275 degree oven for about 3 1/2 to 4 hours
  19. Don’t open the lid to check until the 3 1/2 hour mark. It may be done or it may need a bit more time, but when done you will literally be able to be shred with a fork and it's very tender.
  20. The carrots that you started cooking with the roast will be VERY done by the time the roast is ready.  If you'd like additional carrots done a bit less (or simply a few more carrots), you can add them along with potatoes at the 2 1/2 hour mark if desired.
  21. If you want gravy, remove the roast (and potatoes/carrots if you used them) and put under foil to keep warm.  Remove the rosemary/thyme bundle and the bay leaves.

    The next steps are specifically for gravy.  If you don't want to make gravy you are finished at this point and can skip the additional steps.
  1. There are two different ways to do the next step.  I’ll list both (first is much simpler but the second has a much better, more complex flavor)
    1. This step requires a simple flour/water mixture (about one third flour, two thirds water)

      Bring remaining broth to a boil and slowly add a flour/water mixture , stirring constantly until it reaches the desired thickness

      OR
    2. This step requires one stick butter and one half cup flour.

      Heat remaining broth but don’t bring to a boil yet.  While doing that, melt a stick of butter and then add a half cup (4 oz) of flour to make a roux.


      Mix together well and keep stirring until it starts to turn light brown/tan color.  When it changes color, take a ladle full of the hot broth and put it in the roux. It will make lots of noise and steam so be careful.  Stir until it thickens up again. 


      Continue adding a ladle of broth at a time until it thins just a bit. I generally use about four or five ladles.  Once the broth and roux have been mixed together, add the mixture back into the heated broth.  Heat the broth to boiling and add a flour/water mixture (or cornstarch/water if you prefer) to the broth slowly until it reaches the thickness you’d like. 

      If you want it a deeper brown, add a bit of Kitchen Bouquet (or Gravy Master) until it’s the color you want.
  2. Serve and enjoy!
This is the chuck roast with potatoes and gravy. See top picture for short ribs.