Labels

Monday, July 29, 2013

Pork Tenderloin "Marcata" (and a vegetarian version!)

Pork "Marcata" with green beans,
cantaloupe, bread and oil for dipping!
My wife and I both love marsala AND piccata.  Since we enjoy both I figured that we'd like the two combined, so awhile back, I came up with a mashup of the two.

Now that my wife is vegetarian, I made a vegetarian version (you could easily make this vegan by using tofu instead of the Quorn naked chicken cutlets specified in the recipe and not using butter).  And since I've never had it with pork, I decided it was time to try that as well (you can also make it with chicken or veal).

We aren't fans of capers at our house so I left them out but feel free to add them if you'd like (you'll see them in the ingredients list).

Last month I posted a recipe called "Rosemary-Citrus Chicken (or Tofu)" and you'll find the two very similar - I used this recipe as the basis for that.

Vegetarian version using Quorn "naked cutlets"
The pork version is first - scroll down for the vegetarian version.

If you try it, let me know what you think in the comments.  


Pork Tenderloin "Marcata" (scroll down for Vegetarian version)

Ingredients

  • 1 pound thinly sliced pork tenderloin
  • 1 cup flour
  • 3-4 tbsp butter
  • olive oil for browning
  • 2 small shallots or 1/2 small onion, diced
  • 2 cloves garlic, minced
  • 1/2 cup white wine
  • 1/2 cup marsala wine
  • 1 cup chicken broth
  • 2 tbsp freshly squeezed lemon juice
  • 1 cup portobello mushrooms sliced thin (feel free to use another variety of mushroom or omit them if you don't like them)
  • 1/4 cup brined capers, rinsed (optional - we don't use them but I know lots of folks that love them)

Directions

Pork simmering with other ingredients
  1. Sprinkle spices of your choice over pork slices (I use garlic powder, dried ground rosemary, dried basil, oregano, seasoned salt and fresh ground pepper - very lightly).
  2. Dredge seasoned pork through flour on both sides and let sit while heating oil.
  3. Heat olive oil (I use a garlic or rosemary-infused oil) and butter over medium high heat in heavy bottomed pan.  I prefer to use something other than a non-stick pan for this.  Stainless steel works well.
  4. Cook pork until it's golden brown on both sides (add additional oil/butter if necessary).
  5. Remove pork from pan and add shallots/onions and mushrooms (if you choose to use them).
  6. Cook shallots/onions and mushrooms in the same pan you used for the pork - if necessary add additional oil/butter.
  7. Add minced garlic to the onions and mushrooms for about one to two minutes (long enough to cook but not to burn).
  8. When the garlic, onions and mushrooms are ready, add the wine (both the white wine and the marsala).  Scrape the bottom of the pan to get all of the "good stuff" that may be stuck there and then reduce the wine by half.
  9. Add the chicken broth, lemon juice and capers (if using them) and bring to a boil.
  10. Put the pork back in the pan.
  11. Continue cooking over medium heat until the sauce starts to thicken.  You may also thicken the juices with a water/cornstarch slurry if you'd like.

Quorn Meatless "Chicken Marcata"

Ingredients

Quorn "naked cutlets" browning
  • 1 package (4 pieces) Quorn "naked cutlets" (these are vegetarian, but NOT vegan.  You could easily substitute a block of firm or extra firm tofu, sliced about 1/2 inch thick for the Quorn patties)
  • 1 cup flour
  • 3-4 tbsp butter (omit if you are using tofu and want the dish to be vegan)
  • olive oil for browning
  • 2 small shallots or 1/2 small onion, diced
  • 2 cloves garlic, minced
  • 1/2 cup white wine
  • 1/2 cup marsala wine
  • 1 cup vegetable broth
  • 2 tbsp freshly squeezed lemon juice
  • 1 cup portobello mushrooms sliced thin (feel free to use another variety of mushroom or omit them if you don't like them)
  • 1/4 cup brined capers, rinsed (optional - we don't use them but I know lots of folks that love them)

Directions

Quorn "naked cutlets" simmering
with other ingredients
  1. I find that the spices stick a little better if the Quorn patties are partially thawed.  If they are frozen, you can dip them in milk to help the spices and flour stick better.
  2. Sprinkle spices of your choice over Quorn patties (I use garlic powder, dried ground rosemary, dried basil, oregano, seasoned salt and fresh ground pepper - very lightly).
  3. Dredge seasoned patties through flour on both sides and let sit while heating oil.
  4. Heat olive oil (I use a garlic or rosemary-infused oil) and butter over medium high heat in heavy bottomed pan.  I prefer to use something other than a non-stick pan for this.  Stainless steel works well.
  5. Cook patties until they are golden brown on both sides (add additional oil/butter if necessary).
  6. Remove patties from pan and add shallots/onions and mushrooms (if you choose to use them).
  7. Cook shallots/onions and mushrooms in the same pan you used for the patties - if necessary add additional oil/butter.
  8. Add minced garlic to the onions and mushrooms for about one to two minutes (long enough to cook but not to burn).
  9. When the garlic, onions and mushrooms are ready, add the wine (both the white wine and the marsala).  Scrape the bottom of the pan to get all of the "good stuff" that may be stuck there and then reduce the wine by half.
  10. Add the vegetable broth, lemon juice and capers (if using them) and bring to a boil.
  11. Put the patties back in the pan.
  12. Continue cooking over medium heat until the sauce starts to thicken.  You may also thicken the juices with a water/cornstarch slurry if you'd like.
Serve over egg noodles or rice and enjoy!


Sunday, July 28, 2013

Tacos - beef, chicken or vegetarian/vegan (in 30 minutes!)

Beef tacos
We just got home from a week in Orlando with friends and family.  As you can imagine, it was a fairly hectic, rushed (incredibly fun) week.

We have a timeshare there so we always make sure that we have a place with a kitchen.  It's important to us to still have a couple of meals together at "home" when we are vacationing for many reasons, not the least of which is that it's a lot less expensive (and tastes better) if we do.

It is also important when we choose these meals that they be relatively quick and easy to prepare simply because you are working with less than ideal pans/knives/etc.

I'm explaining all of this just to say that this recipe is easy.  It fits our criteria for a vacation meal that we are preparing: everyone likes it, it's inexpensive and simple to prepare but tastes great.

I actually made both chicken and beef tacos while we were in Florida this week but when I'm at home I frequently also make vegetarian/vegan tacos as well for my wife. I'm going to include recipes for all three here but much of the recipe will be the same whichever one(s) you decide to make.

The other adults that were there with us this week liked them so much they asked me for the recipe so I think I can safely say it was a hit!

TACOS

  • 1 pkg taco seasoning
  • 1 small onion, diced
  • 2 cloves garlic, finely minced
  • 1 bottle salsa (whatever type you like - I generally get whatever's on sale and mild, but any kind will work)
  • chili powder (to taste - optional)
  • garlic powder (to taste - optional)
  • cumin (to taste - optional)
  • salt (to taste - optional)
  • pepper (to taste - optional)
  • Taco shells (you can use hard or soft - we always do both because different folks in the house have different preferences)

TOPPINGS   These are all optional.  This is the fun part, especially for the kids.  They get to build their own tacos, using whatever toppings you have (and whatever ones they like)
  • tomato (diced)
  • onion (chopped fine)
  • lettuce (shredded thin)
  • shredded cheese
  • sour cream
  • salsa
  • taco sauce
  • guacamole
  • avocado
  • refried beans

VARIATIONS
  • 1 1/2 pounds hamburger for beef tacos   OR
  • 1 whole chicken for chicken tacos, cut up (you can use all dark or all white instead if you prefer)  OR
  • 1-2 packages frozen Boca ground crumbles for vegetarian/vegan (Boca is the brand that I know is vegan, but use whatever brand you like).  I say 1-2 packages simply because it depends on how many people you are trying to feed

DIRECTIONS

Beef

  1. Brown hamburger
  2. Just before the hamburger is done, add the onions and garlic and cook until they turn soft
  3. Drain the hamburger

Chicken

The shredded chicken
  1. Add enough water to a large pan to just cover the chicken by at least half an inch
  2. Bring the water to a boil
  3. Turn down to a simmer and let cook for one hour
  4. Remove the chicken until cool
  5. Once cooled, remove the the chicken from the bones, being careful to get ALL of the small bones out
  6. Shred the meat  (if you want great chicken stock, put the bones back in the water you just used, and cook, covered, for another couple of hours.  You can add any herbs/seasonings you like to it - I generally use bay leaf and garlic powder.  At this point, if you wanted a heartier stock, you could also add some carrots and celery to it.  After it's cooked for a couple of hours, strain it, and you have some awesome stock!)  You can cook the chicken a day or two before you actually make the tacos - that's what I did to save some time.  If you do this, just keep it in the refrigerator until you're ready to use it.
  7. Add a small amount of olive oil to a skillet and cook the onions and garlic until just getting soft, then add the shredded meat
  8. The chicken has obviously been cooked at this point, so just heat it until it's hot.  If it starts to dry out, add some of the stock

Vegetarian/Vegan

The Boca crumbles before adding other ingredients
  1. Add a small amount of olive oil to a skillet
  2. Add the onions and garlic and cook until just getting soft
  3. Add the crumbles to the pan with the onion and garlic (the crumbles can be frozen or thawed - it will simply take a little longer if they are frozen)
  4. Heat until the crumbles are cooked through

ALL VARIATIONS

  1. Add the salsa to the pan with your hamburger, chicken or crumbles and stir well (if you want a "saucier" taco, add more salsa or taco sauce)
  2. Add the package of taco seasoning and stir in
  3. Add any additional seasonings you may want (chili powder, garlic powder, cumin, salt, pepper) to taste
  4. Let cook for ten to fifteen minutes to meld the flavors
  5. Follow the directions on the package to heat up your shells/tortillas
  6. Dig in!
That's all there is to it - it may look like a lot but it really isn't.  It typically takes around a half hour to cook (with the exception of cooking the chicken - that I always do a day or two before so that the day I make them it DOES only take a half hour).

These are also very versatile.  If you want nachos, throw some chips on a plate, top with some of the beef/chicken/crumbles and some cheese and throw it in the oven for a few minutes.

Likewise if you want quesadillas, use your beef/chicken/crumbles plus some cheese. For burritos, put some of it on a tortilla along with some cheese, roll it up and put it in the oven. I use this same basic recipe when I do enchiladas as well.

Timesaving tip:  You can double (or triple) this recipe and freeze whatever you have left so all you have to do is throw it in the microwave and have a five minute meal!


Monday, July 15, 2013

Tamarind-Cashew Slaw

I posted a slaw last week (Beet and Carrot Slaw) and had a lot of people ask me about other "different" things to bring to a picnic instead of the traditional ones that everyone is used to - so today I thought I'd tell you about another slaw that I came up with recently.
Tamarind-Cashew Slaw

There are two different parts to this - the first is making the "Tamarind-Cashew" part of the recipe.  If you've ever eaten at The Cheesecake Factory, you may have tried this as a dipping sauce for their avocado eggrolls (which are fantastic).  The sauce is great to use for a number of different things but in this instance I'm using it as a dressing for the slaw (which is the second part of the recipe).

This recipe also has a fair amount of cilantro in it - and cilantro seems to be one of those things that you love or hate with no middle ground.  People that hate it frequently tell me that it tastes like soap to them.  My advice would be that if you are one of those that hates it, simply omit it.  It will obviously have a different taste but will still be good.  If you like it but want a little less of it, use a little less.  The recipe has what I used when I made it which is NOT necessarily what you want to use when you make it for YOUR tastes!

Part 1 - Tamarind-Cashew Sauce

  • 1/2 cup chopped cashews 
  • 1 cup chopped fresh cilantro 
  • 3 cloves garlic, quartered 
  • 2 green onions, chopped 
  • 2 Tbsp. sugar 
  • 1 tsp. black pepper 
  • 1 tsp. cumin 
  • 1/2 cup honey 
  • 4 tsp. white vinegar 
  • 2 tsp. balsamic vinegar 
  • 1/2 tsp. tamarind pulp
  • Pinch ground saffron 
  • 1/4 cup olive oil 
  1. Combine first 7 ingredients (cashews, cilantro, garlic, onions, sugar, pepper and cumin) in a food processor. Blend with short bursts until the mixture is well blended, and the cashews and garlic have been chopped into very small pieces.  I have seen recipes for this that call for it to be processed until it's more of a paste but I prefer it to be in small pieces - do whichever you think you'd like better.  It will taste the same, but simply have a different consistency.
  2. Combine the honey, vinegars, tamarind, and saffron in a small bowl. If you're like me, you haven't had much call to use tamarind before and may not even be certain what it is.  You may be able to find tamarind beans (which look kind of like brown pea pods) in your area - I wasn't able to so instead I used tamarind paste/concentrate that I had on hand from visiting an Asian market in the area.  It's available in many grocery stores or from Amazon and is very inexpensive. 
  3. Heat the mixture for about 1 minute in microwave then stir until tamarind pulp dissolves completely. 
  4. Pour mixture into blender or food processor and mix with cashew mixture (about 20 seconds). 
  5. Pour sauce into bowl, add the oil and stir by hand. Cover and refrigerate at least 30 minutes.
This sauce is incredible to use on just about anything - the eggrolls from Cheesecake Factory are just a start.  There will be plenty left after making the slaw so let your imagination run wild with the rest of it!


Part 2 - The Slaw
  • 1/2 head green cabbage, shredded
  • 1/2 head purple cabbage, shredded
  • 1/2 cup cilantro, roughly chopped
  • juice from 2 medium limes
  • 1/3 cup Tamarind-Cashew sauce (see above)
  • salt and pepper to taste
  1. Combine the green and purple cabbage along with the cilantro in a large bowl after shredding (I use a food processor to shred the cabbage - it makes it MUCH faster and saves my knuckles a lot of pain compared to doing it manually).
  2. Pour in the lime juice and Tamarind-Cashew sauce and mix well.
  3. You may want to add a bit more lime juice or a bit more sauce according to your taste.  There's certainly no right or wrong, let your taste buds guide you.
  4. Chill for an hour.
  5. Salt and pepper to taste just before serving
  6. Enjoy!


Saturday, July 13, 2013

Garden Fresh Vegetable Omelette

Finished omelette with pumpernickel toast, grits, home fries and
 a dollop of my wife's homemade strawberry jam in the center.
Do you have a garden? Go to farmer's markets? Maybe just REALLY like Whole Foods? We do all of these and frequently end up with extra vegetables and aren't quite sure what to do with them. Yes, we can always do another stir fry or just steam them (and they're always good) but sometimes we want to do something different.

That's where the omelette comes in. My wife went out to her garden last night and picked a lot of green beans, sugar snap peas, and summer squash. I'll be cooking some of that for dinner but it was a lazy, rainy day and I wanted to cook breakfast. So, in addition to the vegetables mentioned, I also used onions, garlic (also from her garden but picked last week and dried) and a tomato (it's too early to have ripe tomatoes here so that came from the grocery store.)

I do know that most folks know how to cook an omelette - and if you don't, don't be intimidated. It's pretty easy. You don't have to flip it in the air to turn it over like the chefs you see on TV (though that's what I do and is pretty simple as well with a tiny bit of practice AND the right pan). You can just use a spatula like you would to turn over anything else. The other good part about this is that although I'm using the ingredients that I listed, you can use anything you like - or just clean out your vegetable drawer before it goes bad. You'll get rid of something before it gets wasted and it will taste good on top of it!

This recipe has the added benefit of being healthy and vegetarian - and if you use tofu in place of egg, oil instead of butter, and a vegan cheese (or simply omit it) you could make this a vegan tofu scramble as well (or, if you're like me, you can add a piece of sausage, bacon or ham to it which is decidedly NOT healthy, vegetarian or vegan but to my taste buds sure does go down well).

Chopped ingredients waiting to be added to the pan.

Garden Fresh Vegetable Omelette (makes two large omelettes)

1 (very) small summer squash, cubed
8 sugar snap peas, 1/2 inch chop
10 green beans, 1/2 inch chop
1 small tomato, deseeded, rough chop
1 medium garlic clove, fine mince
1/2 onion, diced
4 eggs (2 per omelette)
4 tbsp whole milk
4 slices cheese (your preference as to type - can also use shredded. I tend to like American in mine while my wife prefers Swiss)
butter or olive oil (enough to coat the bottom of the pan)
1 tbsp olive oil (I like to use an infused oil if I can - garlic infused is great if you can find it. This is for lightly sautéing the vegetables before putting them in the omelette)
Garlic powder
Freshly ground rosemary
Salt and pepper to taste


    1. Heat the olive oil over medium heat in a heavy bottomed pan - the same pan you'll use for the omelette is fine.
    2. Sauteing the vegetables

    3. Add the diced onions and sauté for about two minutes.
    4. Add the rest of the vegetables and sauté until they are just starting to soften - typically two to three minutes About one minute before you are ready to take it off, add the minced garlic and let it sauté as well.
    5. Remove the vegetables and set aside.
    6. Crack the eggs into a bowl and beat them until they turn a pale yellow color.
    7. Heat a heavy-bottomed nonstick sauté pan over medium-low heat (you can use a pan that's NOT non-stick, but you probably won't be happy with the results). Add the butter and let it melt.
    8. Add the milk to the eggs and season to taste with salt and pepper. This is where I add the freshly ground rosemary. I didn't give an amount and that's simply because this is a matter of taste. I LOVE rosemary and use it in many things. My mother HATES rosemary. I would use a lot, she wouldn't use any! That's why I didn't give an amount. Use as much or as little (or none!) as you'd like. I keep dried rosemary leaves in a grinder in the cabinet all the time so that I can add it to anything I'd like easily. 
    9. Grab your whisk and beat the eggs like your life depended on it! Your omelette is going to be better (fluffier) the more air you can get into your eggs. You can always cheat a little bit and use an electric mixer as well.
    10. When the butter in the pan is hot enough to make a drop of water hiss, pour in half the eggs. Don't stir! Let the eggs cook for up to a minute or until the bottom starts to set.
    11. Using a heat-resistant rubber spatula, gently lift one edge of the egg while tilting the pan to allow the still liquid egg to flow in underneath. Repeat with the other edges, until there's no liquid left.
    12. Your eggs should now resemble a bright yellow pancake, which should easily slide around on the nonstick surface. If it sticks at all, loosen it with your spatula.
    13. This is the part that seems to unnerve some people. Flipping the omelette. There's no need to go into omelette heroics here. It will taste just as good if you flip it with your spatula as it does if you throw it in the air while judges in the corner write down your scores for how many triple sow cows (or whatever they call those things) it does on the journey back down. The point is to turn it over however you're comfortable with doing it. Using a spatula is perfectly fine. So, just flip that thing over.
    14. At this point, in my head I draw an imaginary line about half way down the pan. I put all of the ingredients that will be inside the omelette on one side of the line. Add your cheese first - if you're using slices, tear one slice up and lay it on top of the egg. If you're using shredded cheese, sprinkle as much as you'd like on top of the egg. 
    15. Add half the vegetables on top of the cheese. Spread them out evenly across the same half as the cheese.
    16. With your spatula, lift the far side of the egg (the side with no vegetables) and carefully fold it in half, covering the half that has the vegetables. At this point, you'll have one half of your pan empty and the other half filled with a yummy omelette. 
    17. Add another slice of your cheese (if you're using it) on top of the omelette. 
    18. Repeat steps 9-16 for the second omelette.
    19. Plate, serve and enjoy!

    Sunday, July 7, 2013

    Beet and Carrot Slaw and Baba Ghanoush

    I like traditional foods - but not necessarily for a picnic. I'm just not big on cole slaw, potato salad, etc.  I understand liking these things but if I'm bringing something to someone's house, I want it to be "different".

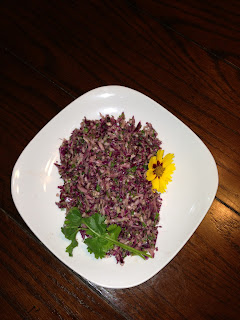
    For the picnic we went to today, I made two different things.  The first is a slaw - just not a cole slaw. It's made with beets, carrots, cilantro and other goodness and has the added benefit of simply looking great on a plate! 

    The second is baba ghanoush (pronounced: BAH buh  guh NOOSH), which is a middle eastern dish.  Even if you don't like it, it's fun to say (I always wonder what would have happened if the Beach Boys had been born somewhere in the middle east instead of in the U.S.  Instead of "Barbara Ann", would we have the song, "Ba Ba Ba, Ba Ba Ga Noush"?  Such is the way my mind works.  I know, scary isn't it?).  

    We happen to love baba ghanoush in our house and there's nothing better than the homemade kind.  If you've never had it, it's very similar to hummus - hummus is made with chickpeas and baba ghanoush is made with grilled eggplant, but they have a similar flavor and consistency.  Even if you don't care for eggplant it's worth trying - grilling it adds a very different, smoky flavor that is not usually associated with eggplant.  It's typically served with pita bread triangles or a thinly sliced baguette.  We like it with baked pita chips as well.


    So, let's get started with the Beet and Carrot Slaw

    Beet and Carrot Slaw
    • 1 tablespoon fresh lemon juice
    • 1 tablespoon fresh lime juice
    • 1 tablespoon red wine vinegar
    • 1 clove garlic, minced
    • 1/2 small red onion, finely diced (about 1/2 cup)
    • Kosher salt and freshly ground black pepper
    • 1 teaspoon cumin seeds
    • 1 teaspoon honey
    • 1/2 teaspoon sweet paprika
    • Pinch cayenne
    • 1/4 cup extra virgin olive oil
    • 2 large carrots, julienned*
    • 1 large beet, julienned*
    • 1/2 cup fresh cilantro leaves, roughly chopped
    1. Put the lemon juice, vinegar, garlic, onions, salt and pepper to taste in a large bowl. 
    2. Set aside for 5 minutes. 
    3. In a small skillet, toast the cumin seeds until fragrant, about 3 minutes, then grind in a spice grinder until fine. 
    4. Add the honey, ground cumin, paprika and cayenne to the bowl. 
    5. Whisk in the olive oil in a thin stream. 
    6. Add the carrots, beets and cilantro to the dressing and toss. 
    7. Taste and add more salt and pepper if desired.
    *julienned or shredded work equally well.  I generally do everything by hand with my knife but because there was so much to do, I started this with my mandoline.  I quickly found out that the beets and mandoline don't really work that well together and were more of a pain than anything.  My wife suggested using the food processor.  I VERY rarely use it and when I do it's really just to combine things rather than shred but I have to admit she was definitely right.  It reduced the time from what would have been half an hour by hand to about three minutes (twice that if you include cleaning up).

      Baba Ghanoush!

      Baba Ghanoush topped with a sprinkle of paprika and
      olive oil.  Served with baguette slices and pita triangles.
      • 2 large eggplants
      • 6 tbsp tahini (if you've never used it before, tahini is similar to peanut butter but made with sesame seeds)  Tahini can (and frequently does) separate just like natural peanut butter.  If this is the case, mix the oil and solid together before using
      • 3 cloves garlic, finely minced
      • 1/4 cup lemon juice
      • 3 tbsp extra virgin olive oil (good quality)
      • 1/3 cup fresh parsley, minced
      1. IMPORTANT: Prick the surface of each eggplant several times with the tines of a fork.
      2. On the grill, on a grill pan or under the broiler (set to high) blacken/char the eggplant for 25 minutes or so. You want the skin to be completely shriveled and dark, and the eggplant almost fall-apart tender.  I prefer the grill if possible - it seems to add a smokier flavor than the other methods.
      3. Set them aside to cool slightly.
      4. When cool, slit the length of the eggplant and peel skin back.  Use a spoon and scrape out as much of the flesh as you can into a bowl - even the stuff that's stuck to the inside of the skin (yes, it's messy!)
      5. Two choices for this part - either mix the eggplant manually or in a food processor.  I've done both and prefer to do it manually.  There's nothing wrong with the food processor method but I've found that the texture gets TOO smooth.  If you choose to do it by hand, try to get it to a relatively smooth texture without being totally pureed.
      6. Add in all other ingredients, stirring and tasting before adjusting seasonings or other ingredients. In other words, if you really like lemon (or garlic, or parsley, etc), add more than the amount suggested.  Likewise if you don't like an ingredient as much, use less or even none.  There's no science here - just your palate and your tastes.  The one suggestion I would make though is not to skimp on the salt in this particular dish - it does make a huge difference and seems to bring out the other flavors.
      7. Serve with pita triangles, baguette slices or pita chips (or all of the above!)
      8. Enjoy!

      Saturday, July 6, 2013

      Vegetarian "Beef" Stroganoff

      "Beef" Stroganoff with grilled
      zucchini and slice of homemade bread
      Even when I make beef stroganoff, I don't really make beef stroganoff.  

      Confusing?

      Let me explain.  Though I certainly can make, and have made, beef stroganoff, I prefer to use pork.  However, when I say I'm making "pork stroganoff" I get very strange looks, so I simply call it beef stroganoff.

      The same concept applies when I make a vegetarian version.  

      So I'm going to tell you how I make beef stroganoff with no meat (or meat products) at all.

      I don't believe that vegetarian food has to be bland and taste like cardboard.  I know, if you're a vegetarian you already know this, but I think it's a fairly common misconception for those of us (like me) who are confirmed meat-eaters.  

      My wife was a vegan when we met.  She eventually changed to vegetarian, then went back to eating meat and has now come almost full-circle and is a vegetarian again.  My goal when cooking for her is to make things that I would like and be happy to eat as a meat-eater.  This is one of the first things I came up with when I started cooking for her a number of years ago and I've made it for a number of other vegetarian friends (you know who you are!).  So far they all seem to love it.  I've even made a vegan version simply by substituting vegan sour cream for the "real" kind.


      Ingredients


      • 2 packages fake beef strips (we get ours at Trader Joe's)
      • 1 cup flour
      • Olive oil for browning
      • 1 package fresh sliced mushrooms (I generally use "baby bellas”, but any kind you like would work just fine - and if you are allergic or simply don't like them, leave them out)
      • 1 small onion, diced (optional)
      • 2 cloves garlic, diced
      • 1 bottle red wine (use whatever kind you like - I've used a shiraz, burgundy, merlot, cabernet.  A good general rule of thumb is that you don't want to use the best stuff but you want it to be something that you would actually drink.  We love "Two Buck Chuck" from Trader Joe's - it's reasonably priced with good flavor)
      • 1 1/2 cup vegetable stock
      • seasoning to taste (I use ground rosemary, oregano, garlic powder and basil - choose seasonings you like.  There's no right or wrong so feel free to experiment)
      • 3-4 bay leaves
      • 8 oz sour cream


      Directions


      1.     Put the flour in a bowl and season it       (I use seasoning salt, black pepper and garlic powder, but you could use any seasonings you like).  Preheat the oven to 350 degrees.

      2.     Dredge the beef strips through the flour.

      3.     Using a heavy bottomed pan (I like to use a dutch oven), lightly brown the beef strips in the olive oil.

      4.     After all of the beef strips have been browned and removed from the pan, saute the mushrooms (and onions if you use them) in the same oil you used for the beef strips.  You will probably have to add a bit more oil – the mushrooms seem to “swallow” it.  Cook them until they soften and the juices start to come out of the mushrooms.
      Browning the "beef"

      5.     Pour the wine into the pan – it will make lots of noise and steam.  You can scrape all of the crusty bits out of the bottom while the wine is cooking – these really help with the flavor. 

      6.     Cook on high until the wine is reduced by about half.

      7.     Add the vegetable stock, put the beef strips back in and bring to a boil.

      After adding mushrooms, onions, wine,
      vegetable broth and seasonings

      8.     Add the bay leaves and other seasonings and stir.

      9.     Put on the lid and put in the oven at 350 for an hour.  You could actually do this on the stovetop as well at a very low temperature.

      10.  Take it out of the oven and put it back on top of the stove.  Take off the lid to see how thick it is – at this point it may be thick enough, but if you think it needs to be a bit thicker, mix together a cornstarch/water slurry and drizzle it in while stirring until it reaches the thickness you want.

      Directly out of the oven
      11.  Add the sour cream, a small bit at a time until it reaches the taste that you want (if you want a vegan version, use vegan sour cream).
      Stroganoff, after adding sour cream

      12.  Serve over cooked egg noodles (it would probably be good over rice as well).  For a vegan version, use eggless noodles or serve over rice.


      If an entire bottle of wine seems like it's too much, simply use more vegetable stock.  Just make sure that the beef strips and mushrooms, etc. are covered by liquid.  I make my own vegetable stock (which is actually VERY simple and tastes MUCH better than store bought) but whichever kind you use will work fine.


      Monday, July 1, 2013

      Rosemary-Citrus Chicken (or tofu - and the tofu version is Vegan!!)?

      Rosemary-Citrus Chicken

      How about some Rosemary-Citrus Chicken (or tofu - and the tofu version is Vegan!!)?


      I was trying to come up with a name for this dish - because it was completely made up out of my head this evening as I was cooking.  Gina (my wife) suggested Rosemary-Citrus Chicken (or Tofu) simply because it has many flavors - but the rosemary and the citrus are the prominent notes.

      In the past, I've made chicken piccata and I love chicken marsala - and I make a combination of the two that I call "chicken marcata" but I wanted to try something a bit different than either of those.  I used my "chicken marcata" as a basic starting point in my head for what I wanted to do and went from there - and if you're reading this and you're vegetarian or vegan, I'll be including the second version I made at the same time for my wife.

      I will start with the chicken version - if you scroll down you'll find the tofu/vegetarian/vegan version.

      Rosemary-Citrus Chicken (scroll down for Vegan/Vegetarian version)

      Ingredients

      • 2-3 large boneless chicken breast sliced or pounded thin
      • 1 cup flour
      • 3-4 tbsp butter
      • olive oil for browning
      • 1 small onion, diced
      • 2 cloves garlic, minced
      • 1 cup white wine
      • 1/2 cup marsala wine
      • 2 1/2 cups chicken broth
      • 2 sprigs rosemary
      • juice from medium size lemon
      • juice from medium size orange
      • Between 1/2 - 1 cup portobello mushrooms (optional - depends on IF you like mushrooms.  If not, omit them.  If so, decide how many and what variety you like)

      Directions

      1. Sprinkle spices of your choice over chicken slices (I use garlic powder, dried ground rosemary, dried basil, oregano, seasoned salt and fresh ground pepper - very lightly).
      2. Dredge seasoned chicken through flour on both sides and let sit while heating oil.
      3. Heat olive oil (I use a garlic-infused oil) and butter over medium high heat in heavy bottomed pan.  I prefer to use something other than a non-stick pan for this.  Stainless steel works well.
      4. Heat chicken until it's golden brown on both sides (add additional oil/butter if necessary).
      5. Remove chicken from pan and add onions and mushrooms (if you choose to use them).
      6. Cook onions and mushrooms in the same pan you used for the chicken - if necessary add additional oil/butter.
      7. Add minced garlic to the onions and mushrooms for about one to two minutes (long enough to cook but not to burn).
      8. When the garlic, onions and mushrooms are ready, add the wine (both the white wine and the marsala).  Scrape the bottom of the pan to get all of the "good stuff" that may be stuck there and then reduce the wine by half.
      9. Add the chicken broth, orange and lemon juice and bring to a boil.
      10. Add the sprigs of rosemary and then put the chicken back in the pan.
      11. Continue cooking over medium heat until the sauce starts to thicken.  You may also thicken the juices with a water/cornstarch slurry if you'd like.


      Rosemary-Citrus Tofu

      Rosemary-Citrus Tofu

      Ingredients

      • 1 block firm or extra firm tofu, sliced about 1/2 inch thick
      • 1/2 cup flour
      • olive oil for browning
      • 1/2 small onion, diced
      • 1 clove garlic, minced
      • 1/2 cup white wine
      • 1/4 cup marsala wine
      • 1 1/2 cups vegetable broth
      • 1 sprig rosemary
      • juice from small lemon
      • juice from small orange
      • 1/2 cup portobello mushrooms (optional - depends on IF you like mushrooms.  If not, omit them.  If so, decide how many and what variety you like)

      Directions

      1. Sprinkle spices of your choice over tofu slices (I use garlic powder, dried ground rosemary, dried basil, oregano, seasoned salt and fresh ground pepper - very lightly).
      2. Dredge seasoned tofu through flour on both sides and let sit while heating oil.
      3. Heat olive oil (I use a garlic-infused oil) over medium high heat in heavy bottomed pan.  I prefer to use something other than a non-stick pan for this.  Stainless steel works well.
      4. Heat tofu until it's golden brown on both sides (add additional oil if necessary).
      5. Remove tofu from pan and add onions and mushrooms (if you choose to use them).
      6. Cook onions and mushrooms in the same pan you used for the tofu - if necessary add additional oil.
      7. Add minced garlic to the onions and mushrooms for about one to two minutes (long enough to cook but not to burn).
      8. When the garlic, onions and mushrooms are ready, add the wine (both the white wine and the marsala).  Scrape the bottom of the pan to get all of the "good stuff" that may be stuck there and then reduce the wine by half.
      9. Add the vegetable broth, orange and lemon juice and bring to a boil.
      10. Add the sprigs of rosemary and then put the tofu back in the pan.
      11. Continue cooking over medium heat until the sauce starts to thicken.  You may also thicken the juices with a water/cornstarch slurry if you'd like.
      Serve over eggless pasta or rice and enjoy!