Labels

Monday, September 1, 2014

BBQ Pork Chops


Now that we're selling our BBQ sauce and rubs at the farmer's market every week, there are several questions I seem to get with regularity.

One of them is: exactly HOW do I cook pork chops on the grill? For those of you that do it regularly, it may seem like an easy question, but if it's something you've never tried, it may not be quite so simple.

Well, I'm here to help.

I'm certain there are MANY different ways to do it, including using things like Italian dressing, etc. Since we're there to sell BBQ sauce and rubs, I think the answer they are looking for is more in line with how to cook and BBQ on the grill, so that's the one I'm going to try to answer.

My first piece of advice is this: brine your pork.

Do you have to? Of course not.

Should you? I feel the answer is a resounding yes.

I had never brined anything until a few years ago but I'm now a HUGE believer in it, particularly for pork and poultry.  As a matter of fact, I'm such a believer in it now that we make and sell our own brine.  It's called "Not Just For Turkey" and it's amazing for any form of pork and poultry.
Bone-in chops are my favorite, but I can't always find the thick ones I prefer.
This is from dinner a couple of weeks ago after a visit to the local butcher shop.

Today's pork has very little fat in it and because of this, it's way too easy to overcook and dry it out - that's why brining is your friend. There are lots of different brines out there; if you don't believe me, do a quick search for it. To paraphrase my grandmother, there are more brine recipes than you can shake a stick at (though I never quite understood why you'd want to shake a stick at all the things I heard that saying used for).

Brining is NOT difficult - quite the contrary. I'm sure you can find some very complicated brines in that search that you just did, but it's really not necessary. The one I use is the aforementioned "Not Just For Turkey".  The directions are on the package, but essentially, you use 1 tbsp of the brine mix with 1 cup of liquid (water, apple cider, wine, etc.). 

A common misconception about brining is that it makes things salty: WRONG!! Yes, there is salt in the brine, but it doesn't make it taste salty - at all.

One other tip: keep in mind that if it's too hot, rainy, snowy, or cold outside or if you simply don't have a grill you can use a grill pan on the stove top for this and it will come out just fine. You'll get the same grill marks and for the most part, the same flavor (some people debate whether or not the open fire on a grill actually adds any flavor - I tend to think it does but wouldn't argue with those that feel the opposite).

Ingredients

  • 6 pork chops (my preference is 1 1/2 inch thick, bone-in pork chops. I can't always find them - including for pictures today - so whatever kind you like or can find is fine. Simply adjust cooking time based on the thickness of your pork chops)
  • 1 tbsp olive oil (enough to coat both sides of chops)
  • Grandpa's Best Butter My Butt & Call Me a Biscuit Pork and Poultry Rub 
  • Grandpa's Best Not Just For TurkeyBrine 
  • Grandpa's Best BBQ Sauce (any variety)

*NOTE: I don't list the amount of rub here simply because you're going to sprinkle the rub liberally on the pork and it's going to depend on the size and number of pork chops you're using.

Directions

  1. Make the brine.  Mix together enough brine mix to cover the chops at a ratio of 1 tbsp brine mix plus 1 cup of your choice of liquid (apple juice/cider works very well with pork, but plain water also works well).  
  2. Add the pork chops to the brine
    Brined chops
  3. Let sit in the refrigerator for at least four hours, up to overnight
  4. Remove the chops from the brine and pat dry, then place on a large pan
  5. Pour olive oil on both sides of chops and rub in to coat
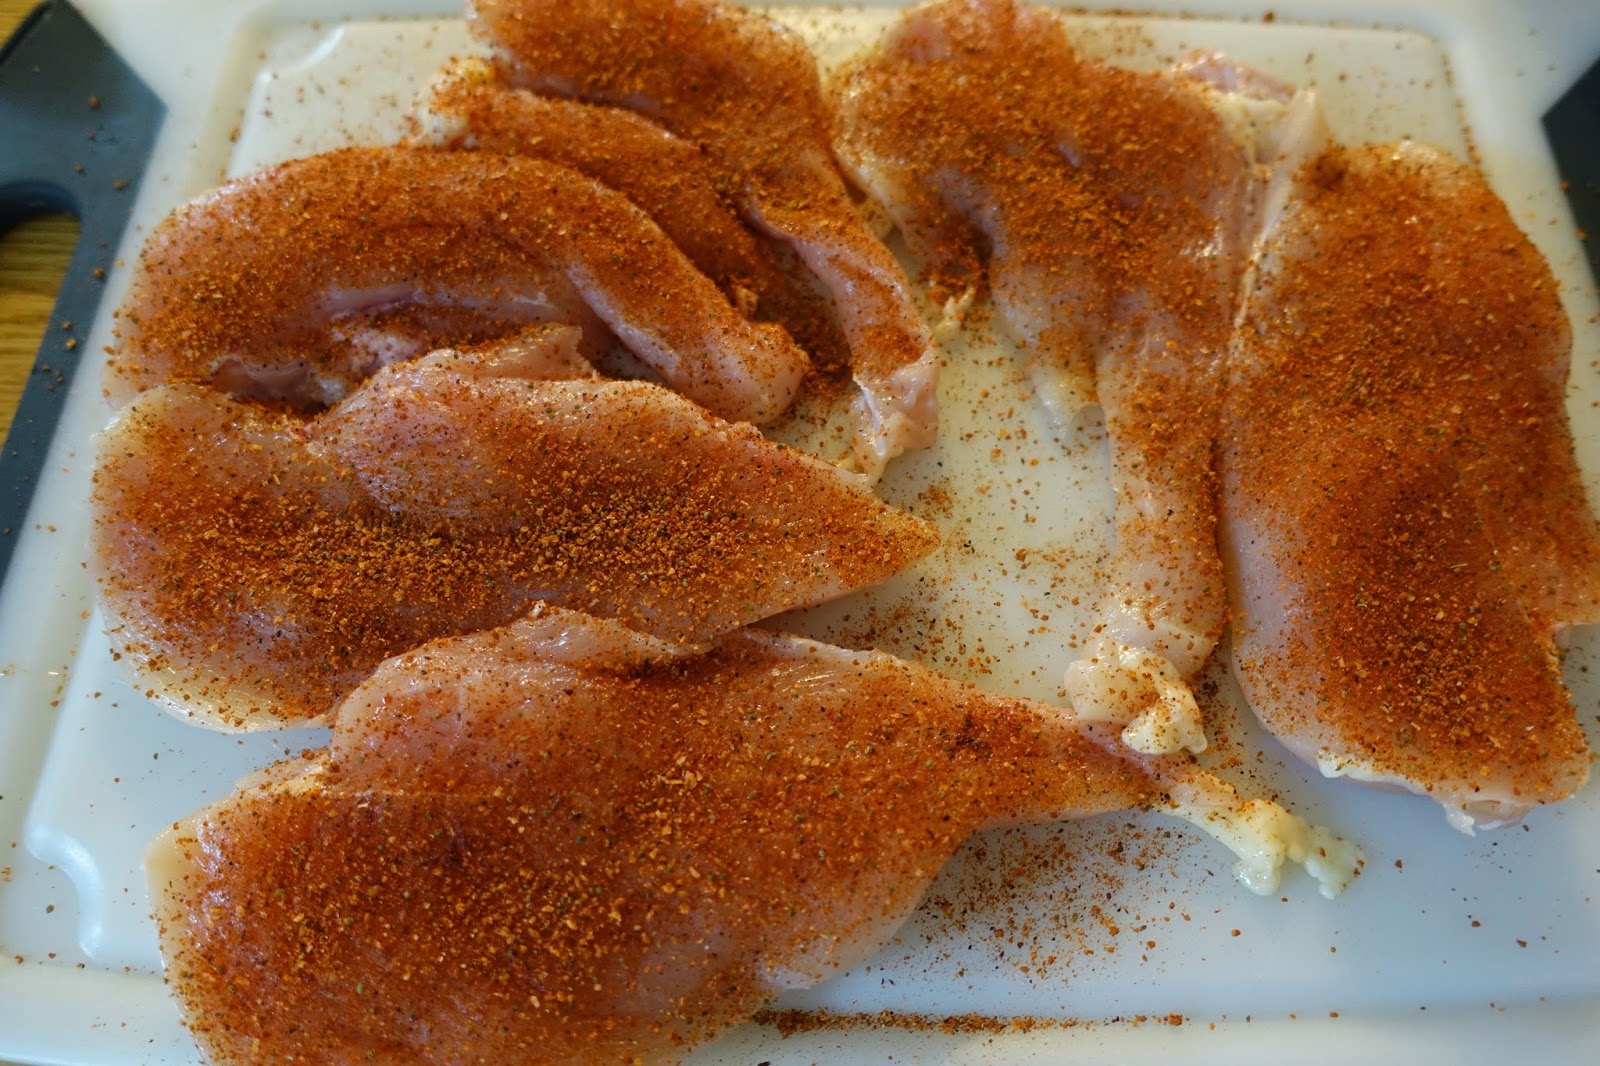
  6. Sprinkle rub liberally over the surface of chops (both sides - see picture for an idea of how it should look); make certain you cover all surfaces of the chops with the rub
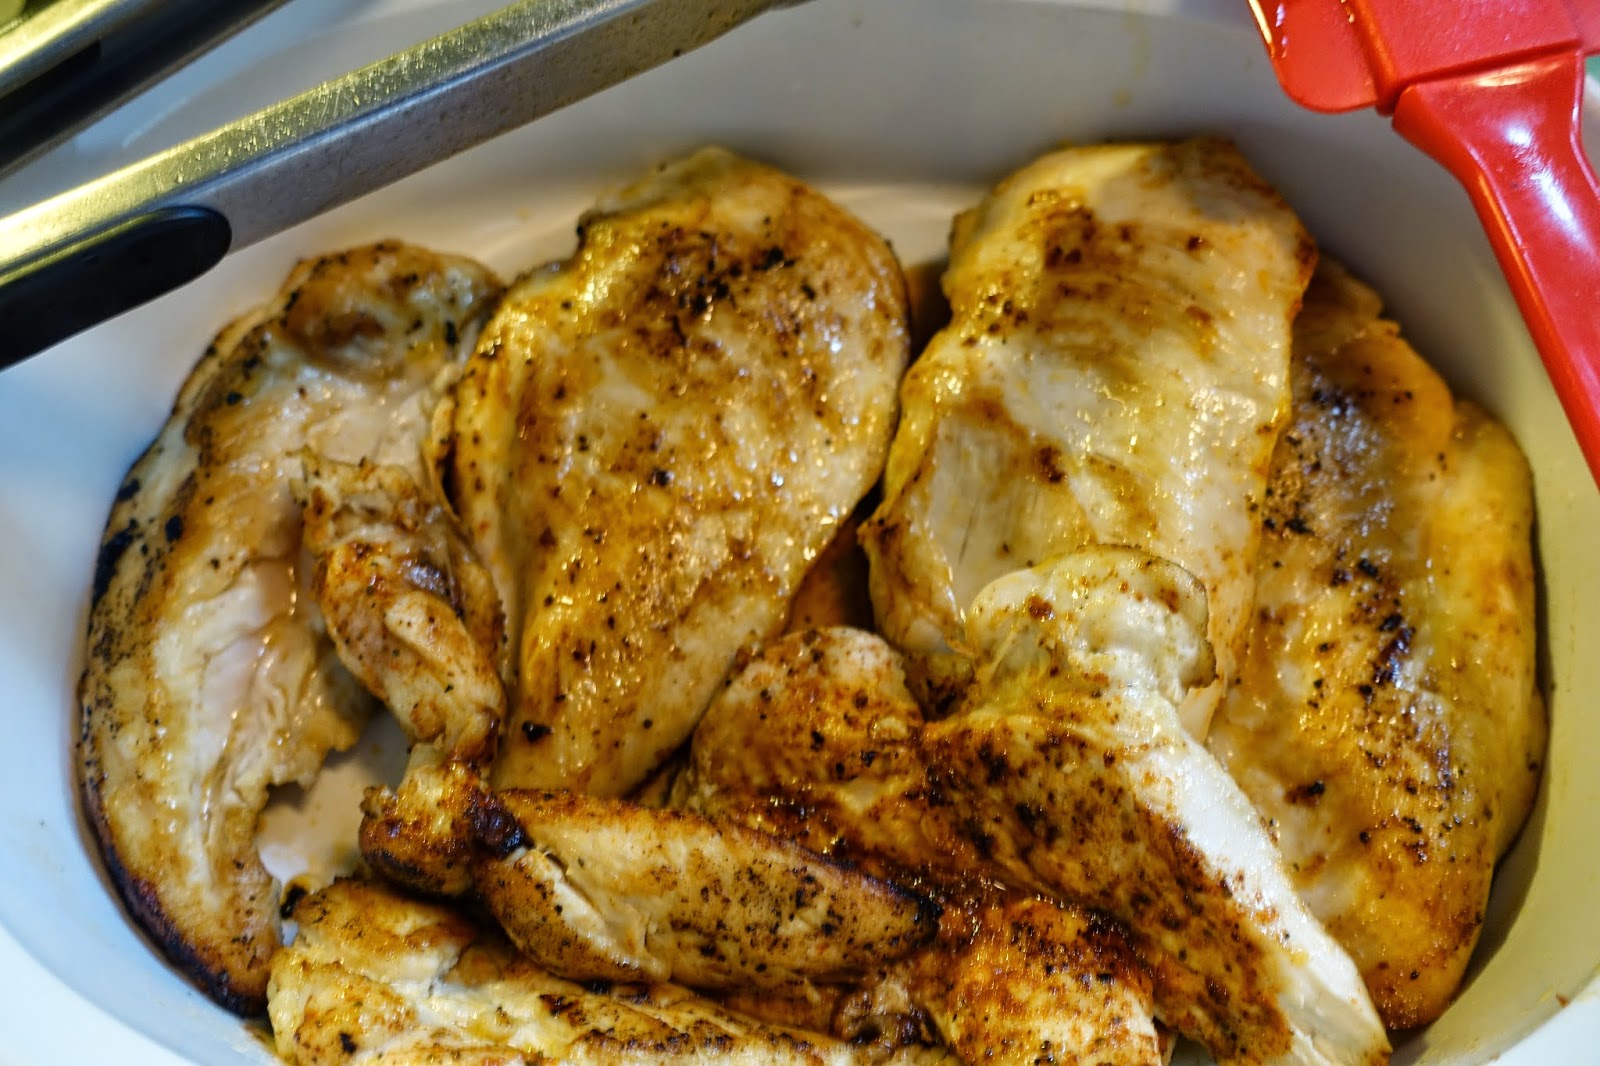
    Apply the rub liberally, then rub into the chops
  7. Place all of the chops on a preheated grill.  I heat mine to about 400 degrees
    Put sauce on the pork chops after placing on the grill
  8. Using a grill brush, spread BBQ sauce on the top of the chops
  9. Close grill and cook for about seven minutes for 1 1/2 inch chops. If yours are thinner, adjust cooking time as necessary
    If you want diamond pattern grill marks, simply turn chops
    45 degrees about halfway through the cooking time for each side
  10. Turn over and again spread sauce on top of the chops
  11. Close grill and cook for another seven minutes
  12. Remove from grill - I typically put a bit more sauce on the last side that was cooked right after removing from the grill (keep in mind, the USDA minimum safe temperature for pork is 145 degrees)
    Let the chops sit for about five minutes after removing from the grill
  13. Let rest for about five minutes
  14. Enjoy!
    Simple and hard to beat!
Let me know what you think in the comments if you try this!!

Tuesday, August 19, 2014

Risotto Cakes

Risotto cakes
My wife said it best last night: mouth orgasm.

These really are that good - well, nearly so anyway since I'm not certain that's a real thing. Whether it is or not, I DO know that the three of us that were here all loved them.

I had them for the first time at a small restaurant up in Northampton, MA a couple of months ago and they were incredible.  They have a different type every day and I was actually disappointed the second time I had them. Ditto when I ordered them at Olive Garden (that one didn't surprise me as much, though I actually think their food is quite good for a chain).

That's when I decided I had to make them myself. After all, when something is this good and you can control what goes into it yourself so that you KNOW you're going to like it, it's a win-win situation!

If you've never had a risotto cake, it's basically leftover risotto formed into balls with some kind of coating and then either pan or deep fried. You can use any type of risotto - the one I used is here, but you really could use whatever type you like. I actually made my risotto the day before and made it with the specific purpose of making risotto cakes.

Since you can make them with different coatings, I chose to use a flour/egg wash/panko coating.  I also chose to deep fry them. You can use regular bread crumbs and pan fry them as well - and I'm certain they would also turn out great.

There is something about the creaminess of the risotto combined with the crunchiness of the panko on the outside that turned it from great to outstanding (the swiss cheese I put inside didn't hurt either).

We topped ours with some homemade roasted garlic aioli that I had whipped up earlier in the day and it was the perfect topping.

If you'd like to try it yourself, here's how:

Ingredients

  • 3 cups leftover risotto, chilled
  • 1 cup flour, for dredging
  • 2 eggs, beaten
  • 1 1/2 cups panko breadcrumbs
  • 1/4 pound cheese cut into 1/4 inch pieces (type is your choice - I used Swiss but whatever you like will work)
  • Vegetable, corn or peanut oil, for frying
  • 1/4 cup grated parmesan

Directions

Remember when you were a kid and your mom told you not to play with your food? Well, this time it's okay - that's pretty much what you have to do for the first part of this.
  1. Set up a dredging station with the flour in one dish, beaten eggs in another and panko breadcrumbs in a third
  2. Take a spoonful of the risotto and place it in the palm of your hand (it obviously helps if your hands are clean first or you wear gloves - or both)
    Place a spoonful of risotto in your hand
  3. Flatten the risotto. It should be about three inches across
  4. Take a slice of the cheese and place in the middle of the flattened risotto
    Place a slice of cheese on the risotto
  5. Take another spoonful of the risotto and place it on top of the cheese
  6. Using both hands, make a patty out of the risotto, being certain to seal the cheese inside the risotto
    Make a patty out of the risotto - make sure the cheese is sealed inside
  7. Dip the patty in the flour, then into the eggs, and finally coat them in panko and set aside

      Coat in flour, then egg, then panko
  8. Repeat steps 2 through 7 until you're out of risotto
  9. In a heavy pan (or a deep fryer) heat the oil until it's between 325 and 350 degrees.  It's important that it not get hotter than this.  If it does, the outside of the cake will get done before the inside gets hot enough to melt the cheese
  10. Very carefully place the patties two to three at a time in the hot oil (how many you can cook at once is determined by the size of your pan - remember, the temperature will drop when you put them in the oil)
  11. Fry for two to three minutes and flip them over while still in the oil, until nicely browned, then remove from the oil
    They should look like this when they're done
  12. Place on a wire rack which will help them stay crispy
  13. Place the wire rack with the patties in a 250 degree oven to stay warm
  14. Repeat steps 10 to 13 until all the patties have been cooked while maintaining the 325 to 350 degree oil temperature
    On a wire rack with a paper towel to absorb extra oil
  15. Arrange on a serving platter and serve hot
  16. Season with salt and pepper to taste and enjoy!

COOK'S NOTE:
We served this with garlic aioli. They are great by themselves but are really complemented by the aioli.

With homemade garlic aioli as a topping


Monday, August 18, 2014

Risotto with Mushrooms, Asparagus and Fresh Peas


I love risotto. I had never tried it until a couple of years ago (yes, I led a sheltered life) but since then I make it regularly. There are many different types, and I've liked all of them I've tried, but my favorite has mushrooms, asparagus and freshly shelled peas.

I also make chicken stock frequently and this recipe is one of the reasons. Risotto is great with canned chicken (or vegetable) stock but it is VASTLY improved with homemade stock. It's also much easier to control how much sodium is in it since you KNOW how much you put (or don't put) in your own stock.

There are a lot of recipes for risotto out there - and the first time I made it I looked at LOTS of them and pared them down to come up with my own conglomeration that suits my tastes.

Making risotto is really kind of an act of love - it's time consuming and demands constant attention as you stand over the stove. Certainly there are package mixes that don't take as much time but they don't come close to the flavor of the real thing - and though it is a bit time-consuming, it's certainly not difficult.

Feel free to change this in any way that suits you - add whatever kind of mushrooms you like (or none!), whatever vegetables you prefer, make it vegetarian by substituting vegetable stock, etc.

I'll also let you in on a little secret - I had an ulterior motive for making it this time around. I wanted risotto cakes. If you've never tried them (they're patties made out of cooked risotto, dipped in flour, egg and panko and deep fried), I'll be posting that as well, but just to give you an idea how good they are, when my wife bit into one she told me she had just had a mouth orgasm.

Now, I won't claim that's going to happen to you, but they are pretty awesome - good enough that it's worth making the risotto for that alone.

If you try it, let me know what you think!


Ingredients

  • 6 cups chicken broth (homemade or canned)
  • 3 tbsp olive oil
  • 8 oz shiitake mushrooms, thinly sliced (or any kind of mushrooms you like)
  • 1 medium onion, diced
  • 3 medium cloves garlic, minced
  • 2 cups Arborio rice
  • 1/2 cup dry white wine
  • sea salt to taste
  • freshly ground black pepper to taste
  • 4 tbsp butter
  • 1/2 cup freshly grated Parmesan cheese
  • 6 oz very lightly steamed asparagus
  • 4 oz freshly shelled peas

Directions

  1. Pour the broth in a saucepan and warm over low heat
  2. Pour 2 tbsp olive oil in a large saucepan over medium-high heat. Stir in the mushrooms and onions, and cook until soft, about 3 - 5 minutes
    Sauté the mushrooms and onions just until soft
  3. Add garlic and mix well. Cook another one to two minutes until garlic is fragrant
    Add garlic and cook until fragrant
  4. Remove mushrooms, onions and garlic and their liquid, and set aside
  5. Add 1 tbsp olive oil to skillet and add rice, stirring to coat with oil, about 2 minutes
    Add the rice to the oil, stirring to coat well
  6. The rice will start to darken a bit; you want it to get to a pale golden color. When it reaches this stage, pour in the wine and stir constantly until the wine is fully absorbed
    Cook the rice until it starts to turn a golden brown, then add the wine
  7. Add 1 cup broth to the rice, and stir until the broth is absorbed 
    Add one cup broth
  8. Continue adding broth 1 cup at a time, stirring continuously, until the liquid is absorbed and the rice is al dente, about 25 to 30 minutes
    Stir until the rice is absorbed...
  9. When all of the broth has been absorbed, the rice should be ready to remove from the heat. 
    ...then repeat until there is no more broth.  The rice
    should look like this before adding the butter
  10. Add the butter and stir until melted
  11. Add the mushroom/onion/garlic mixture and stir well
    Add the mushroom mixture and stir well
  12. Add the parmesan cheese and mix well
  13. Stir in the asparagus and peas
    Add the asparagus and peas and mix well
  14. Season with salt and pepper to taste
    Enjoy!
  15. Serve hot - and enjoy!

Friday, August 8, 2014

Simple Pattypan Squash

Pattypan squash from the farmer's market
Have you ever picked up your share from your local CSA (Community Supported Agriculture) or gone to a farmer's market and come home with something that looks really cool but you simply don't know what to do with it?

That happens to us sometimes. We're trying to broaden our horizons but the truth is there are so many foods out there to try that there are times when we get something and we don't know what to do with it.

That happened this past week when we went to the South Windsor Farmer's Market. It's a beautiful market and a lot bigger than some of the others in the area and since we happen to be there every Saturday it makes it easy to try new things as well as pick up old favorites.

This week, I decided to try something I've seen many times but never actually tried before: pattypan squash.

I asked the young lady I bought it from as well as one of the wonderful people that work there what they do with it - and the answer was basically the same both times: cook it very similar to the way you'd cook yellow squash or even zucchini.

That was all I needed to hear.  This week I made it as a side with dinner and loved it. It had a stronger flavor than zucchini or yellow squash but it's definitely something I'll make again.

Here's what I did:

Ingredients

  • 2 pattypan squash, cut into 1/4 thick slices
  • olive oil (just enough to lightly cover the slices of squash)
  • herbs of your choice (I used garlic powder, ground rosemary and oregano)
  • 1 tsp kosher salt

Directions

  1. Lay the cut squash out on a cutting board and lightly sprinkle with kosher salt. This will draw out some of the water and keep the squash from getting too "mushy"
    The cut squash sprinkled with kosher salt
  2. Let the squash sit for a minimum of 20 minutes, up to an hour
  3. You'll notice that a lot of water has collected on the surface of the squash. Take a paper towel and blot off all the excess water
    Notice the water on the surface of the squash after sitting with the kosher salt
  4. Spray or drizzle olive oil on the squash
  5. Sprinkle on the herbs of your choice
  6. Turn over the squash and repeat steps 4 and 5 above
  7. Lightly oil a grill pan or a grill and preheat (I used a grill pan this time because it was raining outside)
  8. Once the grill (or pan) heats up, place the squash on it and cook until you start to see marks on the underside (three or four minutes)
    The squash with the oil and herbs in the grill pan
  9. Turn the squash and cook an additional three or four minutes until done
    One side cooked and almost ready to eat!
  10. That's it - you're done! Remove from the grill (or pan) and enjoy!

Tuesday, August 5, 2014

Easy Leftover Fried Rice


I don't make much of anything out of a box. I don't necessarily have anything against it, but I prefer to make things from scratch.

Now for anyone that may read this that doesn't know, my wife is a big couponer. She's actually known as the CT coupon lady and because of this, she's able to score some incredible deals and sometimes those deals are for boxed foods.

So, though I don't use them often, there are times when she gets something that's just too good to ignore. When that happens I try to come up with a different way to use whatever it happens to be.

That's what led to this post. She had coupons that allowed her to get Rice-A-Roni for well under a dollar a box.  I'm not a huge Rice-A-Roni fan, but I don't mind it.  I just really don't like using it straight out of the box.

Tonight, we had the results of that - fried rice.  Now, Rice-A-Roni actually has a fried rice flavor. It may be really good - I have no idea because I've never tried it. I wanted to do my own thing with it and in the process use up some of the leftovers in the refrigerator.

This is a great way to get rid of those leftovers - for us, it was leftover chicken.  We didn't have any leftover vegetables, but we DID have plenty from the farmer's market this weekend.

It was a HUGE hit (my son had three servings that I saw - and probably more) and was actually pretty easy to make.

Let me know what you think!

Ingredients


  • 4 cups cooked rice, leftover or refrigerated for at least 2 hours*
  • 3 beaten eggs
  • 2 tbsp canola or other neutral oil
  • 2 cloves garlic, minced
  • 1 cup chopped leftover meat or tofu
  • 1 cup carrots chopped into small pieces (about 2 medium)**
  • 1 cup fresh peas**
  • 5 scallions, sliced thin**
  • 1 leek, sliced thin**
  • 8 oz asparagus tips, cut thin**
  • 2 tbsp soy sauce
  • 1 tsp ground ginger
  • salt to taste
  • pepper to taste


NOTES: 

*I used 2 boxes of chicken Rice-A-Roni that I cooked earlier in the day. I prepared it according to the boxed directions except instead of water I used a Thai-flavored chicken broth.  Feel free to try this or any other kind of rice you'd like.  The one suggestion I have is to NOT use a sticky rice - the drier the better (this is the reason it says to have it refrigerated for at least two hours). If the rice is too moist, the dish could turn into mush.

**These are the vegetables I used - feel free to use any that you like or have on hand.

Directions

  1. Break up large clumps of rice, separate the grains and set aside. I find this is easiest to do with wet fingers
  2. Preheat a wok or skillet over high heat for about 1 minute. Pour in one tbsp oil and heat until it starts to shimmer
    Carrots, leeks, scallions and asparagus
  3. Reduce heat to medium and add carrots, leeks, scallions and asparagus. Cook until tender (about two to three minutes)
  4. Add the garlic and cook until just fragrant, about 30 seconds 
  5. Move all the ingredients to one side of the wok. Break the eggs into the wok, and stir to scramble until they are almost cooked through but still a little soggy, about 1 1/2 to 2 minutes
  6. Remove everything from the wok and set aside
  7. Add remaining oil and heat until it starts to shimmer
  8. Add the meat and cook until just heated through
    Add the rice to the oil and mix well
  9. Add the rice, and mix well. Use your spatula to break up any clumps
  10. Add the soy sauce, ground ginger and salt and pepper to taste
    Add the vegetable mixture and stir well
  11. Add the carrot/leek/scallion/asparagus mixture and stir well
  12. Mix everything well and continue stirring until the rice is heated through (3 - 4 minutes). Add more oil if the rice begins to stick to the wok; reduce the heat if it starts to scorch
    Add the fresh peas then stir well
  13. Add fresh peas and mix well
  14. Taste and adjust seasonings to taste
    All mixed together and ready to serve
  15. Remove from heat and serve immediately


Monday, August 4, 2014

Easy Southwestern Chicken Bake


Lately I've been trying to come up with new ways to use our rubs. My wife and son loved the one I tried tonight and wanted me to write it up.

(For a vegetarian version scroll down.)

Even though this dish is chicken, I actually used the Beef Rub.  Why?  Because of the spices in it vs. the spices in the Pork and Poultry Rub. When barbecuing, the chili powder and cumin in the beef rub really complement the beef itself - but it also works well on chicken if you're looking for a southwestern flavor.

This is actually one of the simpler recipes that I've posted and it's pretty versatile. Like mushrooms? Put 'em in. Don't like them? Leave 'em out. Onions? Same thing.

I use white wine because I like the flavor it gives.  If you don't like it, don't have any around or just want to try something different, use a different kind of wine or leave the wine out altogether and throw some chicken (or vegetable) stock in instead.

There's also a vegetarian version (scroll down) that I made for my wife as well.  You basically make it the same way. I made a pan of each at the same time this evening.

If you try this, please let me know what you think in the comments!

Ingredients CHICKEN VERSION

  • 2 large boneless chicken breasts cut in half (or the leg and thigh equivalent - about 6 to 8 pieces depending upon size)
  • 1 tbsp Mac Brother Beef Rub (or Really Frickin' Hot Beef Rub, depending upon taste) Use more or less to taste
  • 1 1/2 cups white wine
  • 2 tbsp olive oil
  • 2 tbsp butter
  • Juice from 1 lime
  • 1 28 oz can diced tomatoes (I use the ones with garlic and basil but any will do - and if you don't have diced, then stewed, etc. will work just as well)
  • 1/2 onion, diced (optional)
  • 2 cloves garlic, minced (optional)
  • 8 oz package sliced mushrooms (optional)

Directions CHICKEN VERSION

  1. Preheat the oven to 350
  2. Sprinkle the chicken with the beef rub
    Sprinkle chicken with the beef rub
  3. Put the butter and olive oil in a heavy bottomed pan and turn on medium heat
  4. Brown the chicken on all sides in the butter/olive oil mixture
    Brown chicken on both sides
  5. Put the browned chicken in a casserole dish
    Place browned chicken in an oven-safe dish
  6. If you're using onions, mushrooms or garlic, place them in the pan and sauté until just done
    Sauté the onions, garlic and mushrooms in the remaining oil and butter
  7. Pour the wine into the pan where you cooked the chicken; add the lime juice and mix
  8. Turn up the heat and let the wine come to a boil, scraping the pan to get off all of the "bits" stuck to the bottom
  9. Let the wine mixture boil until it's reduced by about half
    Reduce the wine mixture by half
  10. Pour the wine mixture (with or without the onions/mushrooms/garlic) over the chicken
  11. Spoon the diced tomatoes over the chicken pouring any liquid from the can into the pan
    Spoon the diced tomatoes over the chicken and cover and bake
  12. Cover and bake. The amount of time necessary will depend on the amount and types of chicken you're using (white vs dark meat). I typically give it about 20 minutes then start checking the temperature. You want it to be a minimum of 165 degrees to be sure it's cooked thoroughly.
  13. Remove the cover and serve!!  We like to serve it over white rice but it would be great over egg noodles as well.

Ingredients  VEGETARIAN VERSION

  • 2 pieces Quorn naked cutlets
  • 1 tbsp Mac Brother Beef Rub (or Really Frickin' Hot Beef Rub, depending upon taste) Use more or less to taste
  • 3/4 cups white wine
  • 1 tbsp olive oil
  • 1 tbsp butter
  • Juice from 1 lime
  • 1 14 oz can diced tomatoes (I use the ones with garlic and basil but any will do - and if you don't have diced, then stewed, etc. will work just as well)
  • 1/4 onion, diced (optional)
  • 1 clove garlic, minced (optional)
  • 4 oz sliced mushrooms (optional)

Directions VEGETARIAN VERSION

  1. Preheat the oven to 350
  2. Moisten the cutlets with water or milk
  3. Sprinkle the cutlets with the beef rub
    Sprinkle the cutlets with the beef rub
  4. Put the butter and olive oil in a heavy bottomed pan and turn on medium heat
  5. Brown the cutlets on both sides in the butter/olive oil mixture
  6. Put the browned cutlets in a casserole dish
    Put the browned cutlets in an oven-safe dish
  7. If you're using onions, mushrooms or garlic, place them in the pan and sauté until just done
  8. Pour the wine into the pan where you cooked the cutlets; add the lime juice and mix
  9. Turn up the heat and let the wine come to a boil, scraping the pan to get off all of the "bits" stuck to the bottom
  10. Let the wine mixture boil until it's reduced by about half
    Reduce the wine mixture by half
  11. Pour the wine mixture (with or without the onions/mushrooms/garlic) over the cutlets
  12. Spoon the diced tomatoes over the cutlets pouring any liquid from the can into the pan
    Spoon the tomatoes over the cutlets and bake
  13. Cover and bake. I typically cook it this way for about 20 minutes, but since this isn't really meat, you're just heating it up and giving the other flavors a chance to meld. I usually cook it at the same time as chicken in a separate pan and just pull it out when the chicken is done and it's fine.
  14. Remove the cover and serve!!  We like to serve it over white rice but it would be great over egg noodles as well.