Labels

Monday, June 23, 2014

Cheesy BBQ Bacon Meatballs

Meatballs fresh from the oven
What caught your eye?  Cheesy? BBQ? Bacon? Meatballs?

Any one of these things could have grabbed me, but all of them together? Even if I hadn't written this, I'd HAVE to try them!

We had an excess of hamburger sitting around and were tired of burgers (we've had them on the grill several times lately and though I love them, sometimes you CAN have too much of a good thing) so I was trying to come up with something else to make. There's the obligatory meatloaf (which I love) but that's the "normal" fallback I use with hamburger...next idea...

My wife suggested meatballs. She's mostly a vegetarian and even when she ate meat she was never a beef fan so I figured if she'd at least think about trying them, I'd make some.

Meatballs are one of those things that we rarely had growing up in the Midwest - though I think it was mainly because my dad didn't care much for them. I've made them a couple of times but it's never been a real part of my repertoire - until now. Since my son LOVED them and my vegetarian, beef-hating wife even decided to try them and liked them I think it's a necessity that it become a staple around here.

I think that after trying them, you'll feel the same way!

Ingredients

  • 2 lbs ground beef (or use half beef, half pork; 1/3 beef, 1/3 pork, 1/3 veal - whatever you prefer)
  • 8 slices bacon, cooked crispy and broken into small pieces
  • 1 small onion, diced
  • 5 cloves garlic, minced
  • 1 tbsp fresh ginger, grated
  • 1 tbsp olive oil
  • 1 tbsp garlic powder
  • 2 tsp dried oregano
  • 2 tsp dried ground rosemary
  • 1 tbsp Worcestershire sauce
  • 1 tsp liquid smoke
  • 1/4 cup milk (I use whole milk - you can use whatever kind you wish)
  • 1/2 cup Mac Brothers Warm & Smoky BBQ sauce (or whatever BBQ sauce you prefer)
  • 8 oz fresh mozzarella cheese (grated or cut VERY small - you can also use cheddar or whatever type of cheese you prefer)
  • 4 slices day old bread cut into small pieces
  • 2 eggs, beaten
  • 1 tsp salt
  • 1 tsp black pepper


Directions

  1. Preheat oven to 400 degrees
  2. Pour olive oil in a skillet and add the onions over medium low heat. Cook until they are just starting to brown (about five or six minutes)
  3. Add garlic and ginger and cook until they start getting fragrant (you don't want the garlic to burn - about 30 seconds to one minute)
  4. Remove skillet from the stove and let cool.
  5. Place the beef into a mixing bowl, and add the other ingredients: bacon, garlic powder, oregano, rosemary, Worcestershire sauce, liquid smoke, milk, BBQ sauce, cheese, bread, eggs, salt and pepper
  6. Mix well
    All ingredients, ready to be mixed
  7. When cool, add the onions, garlic and ginger and mix with everything else until evenly blended
    Mixed and ready to be made into meatballs
  8. Using your hands, form into 1 1/2-inch meatballs and place onto a baking sheet
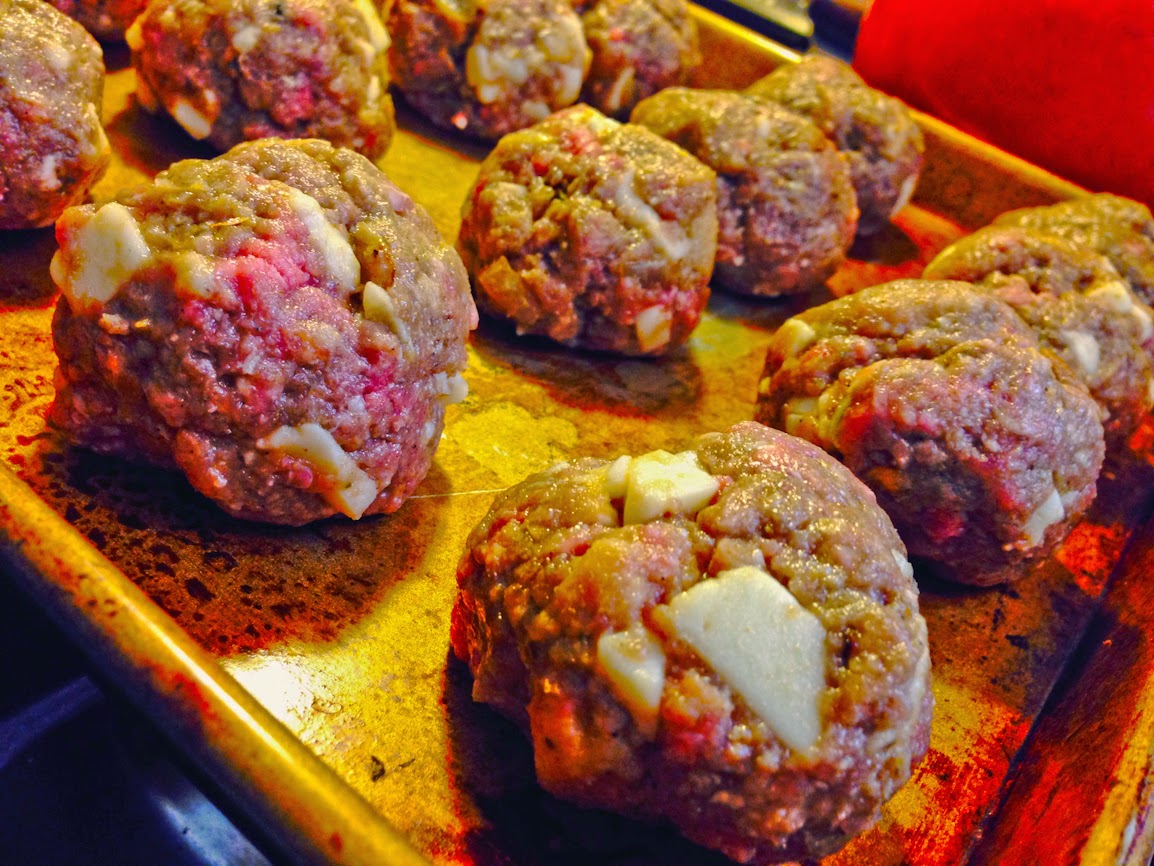
    Ready to go in the oven
  9. Bake in the preheated oven until no longer pink in the center, 20 to 25 minutes


You can eat these as is, slice them up with a bit of BBQ sauce or do what we did and make meatball subs.  If you haven't made them before, it's VERY simple.  

  1. Slice open a grinder roll*, leaving it attached at the back
  2. Cut meatballs in half and arrange on the roll
  3. If you're feeling adventurous and have the time, saute some onions to put on the sliced meatballs
  4. Spoon plenty of your favorite marinara sauce over the meatballs
  5. Cover the meatballs with provolone cheese (or mozzarella or whatever you like)
    Grinder rolls stuffed with meatballs, sauce and cheese - ready for the oven!
  6. Put in a preheated 400 degree oven for about ten minutes or under the broiler for about two minutes
    Fresh and hot!
  7. Enjoy!!!


*If you can't find grinder rolls a hot dog bun will do, but really isn't big enough (for non-New Englanders, a grinder is the same thing as a hoagie or submarine sandwich, so in other words, it needs to be a big roll!).
Dinner is served!

Monday, June 16, 2014

Veggie (vegan!) burgers even a confirmed carnivore will like!

Veggie burger topped with cheese and a slice of tomato


I'm a confirmed carnivore and love a good hamburger - always have, always will.  So does my wife, but since she's gone back to being a vegetarian, the pickin's for a good veggie burger are slim to none (unless we go to Plan B Burger - she says theirs are awesome).

That's why I decided to try to make my own veggie burgers - after all, if I can make some of the other things I do on a regular basis, why not give it a shot?  I found a recipe to use as a base, but then started tweaking - partially because that's just what I do but partially because there are a lot of flavors I thought would be good in a burger that I felt needed to be added.

Now, I'm NOT going to tell you that this "tastes just like a hamburger".  That's simply not true.  I WILL tell you that I liked it - a lot.  It's not going to replace a hamburger for me when that's what I really want, but I liked it enough that I would most definitely have one now and then and thoroughly enjoy it. What's more important is that my wife the vegetarian loved it - on top of that, it's vegan as well (though if you're having issues with it holding together, you can add an egg which will make it vegetarian but not vegan).

I made a double batch and formed them into patties and froze them - this way, if my son and I are having hamburgers, I can just take one out of the freezer for my wife any time I'd like. They are a bit involved to make, but once you've made them, that convenience coupled with the flavor and the fact that you KNOW what's in them makes them well worth the effort that goes into them (and they are NOT hard to make, just a little bit tedious).

Ingredients

  • 3 large red beets (about 1 pound)
  • 1/2 cup brown rice (uncooked)
  • 1 medium yellow onion, diced small
  • 3-4 cloves garlic, minced
  • 3 tablespoons cider vinegar
  • 1 1/4 cup old-fashioned rolled oats or oat flour*
  • 2 (15.5-ounce) cans black beans**
  • 1/4 cup prunes, chopped into small pieces
  • 1 tbsp extra-virgin olive oil
  • 1 tbsp smoked paprika
  • 2 tsp brown mustard
  • 1 tsp cumin
  • 1/2 tsp coriander
  • 1/2 tsp dried thyme
  • 1 1/2 tsp celery seed
  • 2 tsp fresh ginger (finely grated)
  • 1 1/2 tsp liquid smoke
  • 1/2 cup BBQ sauce***
  • 1 large egg (optional for non-vegan burgers)****
  • Salt and pepper to taste

*The directions are for whole oats that you run through a food processor since some may have difficulty finding oat flour.  Either will work fine.

**If you prefer to make the beans yourself, I think you get a better flavor.  Two cans of black beans is about 1/2 pound of dry beans, after being soaked and cooked.
If you have the time, my preference is to make the
beans myself. These were cooked with onion, garlic
and bay leaf.  Canned beans will also work just fine.

***I will only use Mac Brothers BBQ sauces, which are vegan (with one exception that uses honey).  If you want to keep the recipe vegan, simply check whatever sauce you choose for the proper ingredients.

****The purpose of the egg is to help the burgers hold together better. To date, I've had no issue with them holding together (and I haven't used an egg) but if you are, feel free to add one if you're not worried about keeping them vegan.

To serve:

  • Thin slices of provolone or swiss cheese (optional for non-vegan burgers)
  • Hamburger buns

Directions

  1. Heat the oven to 400°F. Wrap the beets loosely in aluminum foil and roast until easily pierced with a fork, 50 to 60 minutes. 
  2. Set aside to cool.
  3. Bring a 2-quart pot of water to a boil. Salt the water generously and add the rice. Reduce the heat to a simmer and cook the rice - you want it a little over-cooked, but still firm (not completely mushy). This should take about 35 to 40 minutes. 
  4. Drain the rice and set it aside to cool.
  5. Heat a teaspoon of olive oil in a skillet over medium-high heat. Add the onions and a pinch of salt. Stir the onions every minute or two, and cook until they are golden and getting charred around the edges, 10 to 12 minutes. You don't want them to burn, but browning is fine.  You want a dark, sticky crust to start to form.
  6. Add the garlic and ginger and cook until it is fragrant, about 30 seconds. 
  7. Pour in the cider vinegar and scrape up the dark sticky crust. Continue to simmer until the cider has evaporated and the pan is nearly dry again. 
  8. Remove from heat and set aside to cool.
  9. IF USING OAT FLOUR, SKIP THIS STEP! Process the oats in a food processor until they have reduced to a fine flour. Transfer to a small bowl and set aside.
  10. Drain and rinse one of the cans of beans and transfer the beans to the food processor. If instead, you have made your own beans, add half to the food processor (half should be about two cups)
  11. Scatter the prunes on top of the beans. 
  12. Pulse in 1-second bursts just until the beans are roughly chopped — not so long that they become mush — 8 to 10 pulses. 
  13. Transfer this mixture to a large mixing bowl. 
  14. Drain and rinse the second can of beans and add these whole beans to the mixing bowl as well (if you've made your own beans, add the rest of them instead - again, it should be about two cups).
  15. The beets should be cool for this step! Use the edge of a spoon or a paper towel to scrape the skins off the cooled roasted beets; the skins should slip off easily (I actually use food prep gloves and the back of a butter knife - it keeps my hands from getting stained from the beet juice!). 
  16. Grate the peeled beets on the largest holes of a box grater and then squeeze as much juice as you can out of them. 
    Grate the beets on a box grater, using the largest holes.
  17. Put the beets (they should have very little juice in them at this point), cooked rice, and sautéed onions, garlic and ginger in the bowl with the beans. 
  18. Sprinkle the olive oil, brown mustard, smoked paprika, cumin, coriander, celery seed, and thyme over the top of the mixture. 
  19. Add the liquid smoke and BBQ sauce and then mix all the ingredients until combined (I find this easiest to do by using food prep gloves and my hands - I can get everything mixed much better - and faster - this way). 
    All the ingredients before being mixed together.
  20. Taste the mixture and add salt and pepper as needed.  You can also add (or delete!) anything else you'd like at this point.  Like curry?  Add a bit in.  How about an Italian flavor? Add some oregano!  Make it yours!
  21. Add the oat flour and egg (if using), and mix until you no longer see any dry oatmeal or egg.
  22. Cover the bowl and refrigerate. You want to let it sit for a minimum of two hours or preferably overnight. You can also keep it refrigerated for up to three days before cooking.
    This is the mixture before going into the refrigerator overnight.
  23. When you're ready to start cooking, first shape them into burgers by taking about a cup and shaping it into a patty with your hands (the same way you would with actual hamburger). If you can, make it about the same size as your hamburger buns.  I was able to make about eight patties, but you may have more or less depending on the size.
    The patties ready to be cooked.
  24. Heat a cast-iron skillet over high heat and add a bit of vegetable (or corn) oil to completely coat the bottom of the pan. 
  25. When the pan is good and hot, place the burgers in the pan without crowding.
  26. Cook the patties for 3 minutes, then flip them over (they will develop a nice crust - my wife's favorite part!).
    A cast iron skillet helps develop a good crust on the burgers.
  27. Cook for another 3 minutes, then put the cheese (IF using) on top of the burgers and cover the pan and reduce the heat to medium-low. 
  28. Cook for an additional four minutes.
  29. While the burgers are cooking, spread a little olive oil on the cut side of the buns and place cut side down in a heated pan (it should take about two minutes to toast - I add a sprinkle of garlic powder on the olive oil before toasting for additional flavor).
  30. Place the burgers in the toasted buns, top with condiments and whatever veggies you like and enjoy!

Sunday, June 1, 2014

(Oven) Smoked BBQ Brisket

Now that summer is finally here I'm able to do one of my favorite types of cooking - smoking meats. To me, nothing says summer quite like the smell of wood burning over an open fire and meat slowing cooking and absorbing the flavor of the smoke. When I smoke something, it's most often a brisket. If you've never had any kind of brisket other than the corned beef type for St. Paddy's Day, this is very different.  You actually start with a brisket that has NOT been "corned" (which is basically a type of brining using a similar brine to that used to make pickles). It's simply a cut of meat like any other that you would get from your grocery store that you then use your smoker to turn into a very tender slice of heaven.
A smoked brisket directly from my smoker
But I didn't always have a smoker (or a grill) to cook my brisket (and I know not everyone does whether it's because they wouldn't use one, don't want one, live in an apartment and can't have one or any of a thousand other reasons). When I was young, my mother always made this for us - and we didn't have a smoker then either. There IS a way to get a similar, smoked flavor to your brisket without smoking it - and that's what I'm here to help you with.  I'll tell you upfront that it's not going to have the same type of look to it that you get from cooking in a smoker - no "bark" (the cooked exterior) and no "smoke ring" but you DO get a smoked flavor and that's the most important part.

Oven smoked BBQ brisket!

My family has been giving out this same basic recipe for years - I've made a few alterations here and there but it's basically the same as it was when I was a kid (and that's more years than I care to count).

If you decide to try it, let me know what you think!

Watch how to make it here!
https://www.youtube.com/watch?v=qvX-_rzkh1k

Ingredients

4 - 8 pound beef brisket*
Beef rub**
3.5 oz bottle Wright's Liquid Smoke***
1 tbsp celery seeds
2 tbsp olive oil

*There are different cuts of brisket: the flat, the point and a whole brisket which is sometimes called a packer brisket (a whole or packer brisket is both the flat and point together, simply not separated. Also, I mentioned this before, but it's worth mentioning again - you do NOT want a corned beef brisket).

I typically use either a whole or flat cut. Beef prices have risen so much that when I bought a brisket last week, whole briskets were $3.39/lb and flats were $7.59/lb.  For that, you can get a whole brisket that weighs twice as much for the same amount as a flat.  I bought an 11 pounder, removed the point and was left with seven pounds for the flat and paid less that I would have for a five pound flat.  I then had four pounds of point to turn into burnt ends (arguably the best part of a brisket) for far less than the equivalent flat cut.

**There are LOTS of different kinds of rubs and just as many opinions as to which one is best. I suggest either finding a rub recipe you think you'd like and trying that or simply buying one at the store (you'll have a lot to choose from). Here is a link to one that I've tried before and really like, but again, feel free to use whatever YOU prefer. When we were younger, we didn't use a rub at all - we simply used the celery seed on top of the brisket along with the liquid smoke and that works as well!
Liquid smoke

***Liquid smoke is one of those things that a lot of people seem to either have never heard of or are kind of confused about. Exactly what is in it? Well, if you buy Wright's, the answer is water and hickory smoke concentrate.  It is actually made from hickory (or applewood or mesquite depending on the type you buy) wood that is burned inside a chamber. As the smoke rises it is captured in a condenser and it cools. The cooled smoke forms water droplets (condensation). These droplets are then collected and filtered.  That's it. No other additives (which is one of the reasons I prefer the Wright's brand - there are other brands and they typically have additives).


Directions

This needs to sit overnight, so start the DAY BEFORE you want to cook the brisket:
  1. Take the brisket out and put on a cutting board or in a large pan
    This was an 11 lb whole brisket. The point was removed,
    leaving a 7 lb flat cut that went in the oven
  2. Thoroughly rub one side of the brisket with one tbsp olive oil
    Rub thoroughly with olive oil
  3. Generously sprinkle the rub over the entire side of the brisket and rub it into the meat
    I only put the rub on one half so you could see the difference.
    You want to put the rub on the entire thing though, not just one half.
  4. Rub the rub thoroughly into the meat (sounds a bit redundant, doesn't it?  You get the idea though)
    After being rubbed into the meat - again, do the entire thing, not just half
  5. Flip the brisket over and repeat the process on the second side, making certain to get the sides and ends coated with the rub as well
    The second side after being rubbed with oil.
    Notice this side looks very different - no fat.
  6. Put the brisket into a large pan, fat side up, and sprinkle the celery seeds over the top
  7. Pour the entire bottle of liquid smoke into the pan, then cover the pan (aluminum foil works fine) and put in the refrigerator overnight
    With the celery seeds and liquid smoke added

When ready to cook:

  1. Preheat oven to 225
  2. If you have a meat thermometer, place it in the thickest part of the brisket
  3. Put the brisket (covered) in the oven
  4. Bake until the internal temperature is at least 195. How long this takes is going to depend on the size of your brisket (the seven pound one I just cooked took about five hours).
    Cook to an internal temperature of 195.  If you cook it over that you won't hurt anything.
    My mother actually prefers to cook it a bit longer and prefers it that way
  5. When ready, remove the cover, flip it over (the fatty side should now be down) and coat with your favorite BBQ sauce
    Coated with BBQ sauce
  6. Turn the oven up to 400 degrees and cook for another 20 minutes (cover removed)
    Out of the oven and ready to sit for a few minutes before slicing
  7. Remove from the oven and let sit for fifteen minutes
  8. Slice thin (very important to slice AGAINST the grain not with the grain), pour on your favorite sauce and enjoy!

Ready to eat!!


Monday, March 17, 2014

Irish Egg Rolls (corned beef, cabbage, potatoes and carrots)


If you're Irish like I am (and even if you're not) there's a good chance you may have had corned beef and cabbage recently since today is St. Patrick's Day.

And if you make large quantities of food like I do, then there's an equally good chance that you have plenty of leftovers (we actually plan it that way because we enjoy them almost as much as the first time we serve it).

If that's the case, you may be wondering exactly what to do with some of those leftovers. I'm here to help!

I usually either just heat them up as is, make reuben sandwiches or chop them up to make hash (I can't stand the hash from a can - it looks and tastes too much like dog food) but it's awfully good when it's made from scratch.


I wanted to try something a little different this time around - and I've been making eggrolls recently so I decided to combine the two.

They came out fantastic. My son loves the corned beef and the potatoes but refuses to eat the cabbage and carrots so I wasn't certain how he'd react to the eggrolls with all of the above in them. I was more than pleasantly surprised when he told me (repeatedly) how much he loved them and that he'd REALLY like for me to make them again.

We used thousand island dressing as a dip which really gave them the flavor of a crunchy reuben.  If you don't happen to have any on hand, you can do what we did and make your own by combining catsup, mayo and a bit of pickle relish.

Keep in mind that you can also make this with packaged corned beef (or some from the deli) if you want to try it and don't have any leftovers to use.  You can also make it with or without any of the other ingredients - don't like cabbage?  Leave it out. Same thing with the carrots or the potatoes. I used all of it but it's certainly not necessary. Likewise, I'm listing the amount of leftovers I used but you can use more or less depending upon how much you have or simply how many eggrolls you want (the recipe below made about 15).

Finally, I use the eggroll wrappers that you find in a Asian market as opposed to the ones that you find in your local supermarket.  Both will work, but the ones you find in a supermarket are far more "bubbly", aren't as crispy and are "chewier".  Conversely, the ones in an Asian market are MUCH crispier, very smooth and have a wonderful "crunch".

These are the wrappers I prefer to use, but any will work

If you try them, let me know what you think!

Ingredients

  • 1 pound cooked corned beef
  • 1 1/2 cups cooked cabbage
  • 3 small cooked potatoes, diced
  • 4 small carrots, diced
  • 2 ounces Swiss cheese, diced
  • 1 small onion, diced
  • 2 cloves garlic, minced
  • 1 tbsp butter
  • 12-15 egg roll wrappers
  • 1 tbsp cornstarch
  • 1/2 cup water
  • oil for frying
  • salt and pepper to taste

Directions

  1. Mix corned beef, cabbage, potatoes and carrots in a bowl
  2. Melt the butter in a skillet and then sauté diced onion until soft and just starting to brown (about three minutes)

  3. Add minced garlic and sauté until fragrant (about two minutes) 

  4. Add the corned beef, cabbage, potatoes and carrots to the skillet and cook, stirring occasionally until heated throughout

  5. Season to taste with salt and pepper
  6. Remove from heat and set aside
  7. Mix the water and cornstarch well
  8. Place the eggroll wrapper on the counter with one corner pointed towards you

  9. Add about 2 tbsp filling and a bit of Swiss cheese on top of the wrapper

  10. Start rolling the wrapper up and around the filling. It's very important to wrap as tightly as you can. 

  11. Fold the right and left corner to the center

  12. Roll towards the remaining corner but stop just before you get to the end

  13. Brush the tip with the cornstarch water mix using a pastry brush (if you don't have one, your fingers will work)

  14. Continue rolling and then lightly press the edges to seal

  15. Repeat steps 8 through 14 until you use up all of your filling (or your wrappers)
  16. Heat oil to 375° F

  17. Fry for 2-3 minutes until golden brown

  18. Drain the egg rolls on a cooling rack with paper towels until cool enough to serve

  19. Serve with thousand island dressing or your favorite mustard
  20. Enjoy!

NOTE:  You can actually make these and freeze them to cook later. Simply place a sheet of parchment paper on a cookie sheet and put the eggrolls on top of them (make certain they are not touching). Place in the freezer for a couple of hours until they are frozen solid, then place them in a freezer bag and pull them out when needed and fry in 375 degree oil until golden brown.

Sunday, March 2, 2014

The BEST chocolate chip cookies ever!! (no, really - you have to try them!)


I'm not entirely sure why, but when I think of cookies, I ALWAYS think of chocolate chip cookies.  I like most all kinds, but there's no doubt which ones are my favorite.

I also am aware that lots of people think theirs are the best.  And the title of this posting may be a bit of hyperbole because it's entirely possible they aren't the best...but I'm betting they're pretty darned close!

So, what makes them so good? I'd have to say it's really two things; the steps to create them and the addition of a bit of cinnamon and nutmeg.  I know that you won't find many chocolate cookie recipes with either of those ingredients, but it DOES make a difference.  I guess you'll have to try it yourself to really know for certain!!

Ingredients

  • 1 cup (2 sticks) butter, softened 
  • 1/2 cup sugar
  • 1 1/2 cup packed brown sugar
  • 2 eggs, beaten 
  • 2 tsp vanilla (double strength if you have it available)
  • 2 3/4 cups (12 oz) all ­purpose flour (if at all possible, weigh the flour to be certain you have the correct amount) 
  • *3/4 tsp ­medium coarse sea salt
  • 1 tsp baking soda
  • 1 1/2 tsp baking powder
  • 2 tsp cinnamon
  • 1/2 tsp nutmeg
  • 2 cups dark chocolate chips (I actually use one cup dark chips and one 3.5 oz Lindt Dark Chocolate "A Touch of Sea Salt" bar cut into small chunks)
​NOTE

*If possible, use sea salt and not table salt. You will get much better flavor (and texture) that way. If you only have table salt, use 1/2 tsp. ​

Instructions

  1. Preheat oven to 350 degrees
    Butter, sugar, brown sugar, cinnamon and nutmeg
  2. Cream butter, sugar, brown sugar, cinnamon and nutmeg (approx. 3 minutes on medium­/high speed on a Kitchen Aid Mixer)
    This is what it should look like after properly creaming the butter and sugars
  3. Add eggs and vanilla and beat for an additional 2 minutes
    After adding the eggs and vanilla and beating together
  4. Add baking soda, baking powder, salt, and flour. Mix until just incorporated (don't over mix at this point)
    Add the flour, baking soda, baking powder and salt
  5. Add chocolate chips and stir until well distributed. The batter should be fairly thick
    I use half chips and half cut up dark chocolate bar.  This is a Lindt
    dark chocolate "A Touch of Sea Salt" bar chopped into small pieces
  6. At this point, I put the batter in the refrigerator to chill for a minimum of an hour but preferably overnight. It's not an absolutely necessary step but it DOES make a difference in the texture of the cookie

  7. Remove from the refrigerator and drop about 2 tbsp of dough onto a baking sheet lined with parchment paper
    My brother and son enjoying making cookies together
  8. Bake for 12-­14 minutes until the edges are nice and golden brown 
  9. Remove from oven and allow to cool on the cookie sheet for about two minutes 
  10. Pick up the parchment paper with the cookies still on top and transfer to a cool non­porous surface (I put a cookie sheet in the freezer to chill and take it out and put them on that. They cool very quickly that way. I actually use two cookie sheets to bake on and keep two in the freezer and swap them back and forth)
    My brother and son - they were very
    proud of  the cookies they made!
  11. Allow the cookies to cool on the paper for at least 3 minutes before serving
  12. Enjoy!